![ShippyPro Logo-1.svg]](https://help.shippypro.com/hubfs/Imported%20sitepage%20images/ShippyPro%20Logo-1.svg)
This guide walks you through connecting your BRT account to ShippyPro. It explains every field in the connection window: what it means, whether you need it and where to find the value. Gather everything in the checklist first and the connection takes a few minutes.
Overview:
ShippyPro connects to BRT through BRT's REST API. To use it you need an active BRT contract and REST API credentials, which BRT activates for you. If you don't have them yet, you can request them from ShippyPro (see Don't have your API credentials yet?).
What you'll need
To connect BRT you need these three details. You should already have them from BRT, but they may be called something different, so here is where to find each one. The other fields depend on the services in your contract and are explained in 2. Carrier's Configuration.
| Field in ShippyPro | Where to find it |
| BRT Customer Code (codice cliente) | Top-left corner of every BRT invoice. It's also in the email BRT sends when it activates your API access. |
| API Password (password API REST) | The email BRT sends when it activates your API access. It is NOT your brt.it customer area password. |
| Departure Depot (deposito di partenza) | The first three digits of your customer code. Example: 0123456 → 012. |
💡 Don't know your BRT contact? Call your BRT branch. On brt.it, go to Customer service › Search for a branch, pick your region and province, and you'll see each branch with its phone number.
Start connecting BRT
- In the left menu, go to Integrations › Carriers and click + Add Connection.
- On Select a Carrier, search for BRT and click its logo.
- Choose how you want to continue:
- I already have my API credentials: go to 2. Carrier's Configuration.
- I don't have my API credentials yet: see Don't have your API credentials yet? below.
Don't have your API credentials yet? Request them
If BRT hasn't activated API access on your account yet, ShippyPro can send the request to BRT for you.
- Go to Integrations › Carriers, click + Add Connection, select BRT and choose I don't have my API credentials yet.
- Fill in the form:
- Email address of your carrier contact: the email of your BRT sales representative. The activation request is sent to this address. If you don't know who your contact is, call your BRT branch (see the tip above).
- Customer code: the code BRT assigns you when your contract is activated. You'll find it in the top-left corner of every BRT invoice.
- Departure depot: the first three digits of your customer code (example: 0123456 → 012).
- Transmission: how your shipments are confirmed to BRT. BRT sets your account up with the option you choose here.
- Automatic: shipment data is sent to BRT as soon as you create the label. The End of Day is created automatically.
- Manual (explicit): shipment data is sent to BRT later, when you close the work day yourself.
- Click Send. ShippyPro sends the activation request to your BRT contact and copies you in. Check your mailbox and wait for BRT's confirmation.
- When BRT activates your API access, you receive your credentials by email. Select BRT again from Integrations › Carriers, choose I already have my API credentials and follow 2. Carrier's Configuration.
Once you've received your API credentials from BRT by email, go to Integrations › Carriers, click + Add Connection, select BRT and choose I already have my API credentials. Then fill in the fields as explained below.
⚠️ Match your contract. Select only the services and options agreed in your contract with BRT. Choosing something different here won't change your contract, and it may cause shipments to fail.
Step 1: Credentials
- BRT Customer Code (required): your BRT customer code. You'll find it in the top-left corner of every BRT invoice, and in the email BRT sends with your API password.
- API Password (required): the REST API password BRT emails you when it activates the API service on your account. It arrives in the same email as your customer code. It is NOT the password for the BRT customer area on brt.it. Paste it without spaces.
- Departure Depot (required): the first three digits of your BRT customer code. Example: customer code 0123456 → departure depot 012.
- Test Mode (optional): BRT may give you test credentials designed for trying out the connection. If you have them, tick Test Mode to create test shipments. When you connect with your real credentials, leave it unticked.
-
Step 2: Service And Label
- Label Type: the file format of your labels. Pick the one that matches your printer:
- PDF A4: a PDF on A4 paper. Works with any office or home printer: cut the label out and attach it to the parcel.
- ZPL: for thermal label printers (e.g. Zebra) that print on rolls of adhesive labels, without ink. Faster for high volumes. Your printer must support the ZPL language (check its manual or settings).
- DP5: only for shipments on the DPD network (DPD Direct Infeed). BRT asks you to use it when it activates Direct Infeed on your account. It's a thermal format, so you need a thermal printer, and it needs its own connection with Network set to DPD.
- DPH
- Label Type: the file format of your labels. Pick the one that matches your printer:
- Service Type: the BRT delivery service used for your shipments. Choose the one in your BRT contract:
- Standard Service (BRT Express): standard delivery in 24/48 hours anywhere in Italy, with no limit on weight or number of parcels.
- Priority Service: delivery by 12:00 on the day after pickup, to about 3,000 locations in Italy. Deliveries to Calabria, Sicily and Sardinia take a little longer.
- 10:30 Service: delivery by 10:30 on the day after pickup, to about 1,500 large and medium-sized towns. Each shipment can weigh up to 100 kg and measure up to 0.5 m³.
- Distribution Service
- Service Code (optional): an extra BRT service. Leave it on Nessuno (none) unless BRT has activated one of these for you:
- Return From Shop: for returns. Your customer drops the return parcel at any BRT-fermopoint (partner shop) instead of waiting for a courier. BRT must enable it on your account and give you a Return Depot code, which you enter in the Return Depot field.
Limits: no cash on delivery, under 20 kg and 0.2 m³, and the return sender's email or mobile number is required. - Fresh Service (BRT fresh): refrigerated delivery of packaged fresh food at 0–4 °C (no frozen goods), only in cities where BRT fresh is active. Each shipment needs the product's expiry date in the format Y-m-d, e.g. 2026-11-30.
- Return From Shop: for returns. Your customer drops the return parcel at any BRT-fermopoint (partner shop) instead of waiting for a courier. BRT must enable it on your account and give you a Return Depot code, which you enter in the Return Depot field.
Configure Print Preferences: these settings are saved in your profile, not in the BRT connection. The link in Step 2 opens them in a new tab. There you choose your label page format (A4 or A6 ZPL) and which documents print right after your labels, such as an items card, address card, packing slip, order summary or invoice.
Step 3: Additional Options
- Network (default: Italy): the BRT network that carries the shipment. Pick the one your BRT contract covers for this connection:
- Italy: domestic shipments in Italy (also San Marino).
- DPD: BRT's European network for small parcels to EU countries. In ShippyPro each DPD shipment can contain only one parcel, so ship a multi-parcel order as separate shipments.
- EuroExpress: BRT's European network for multi-parcel shipments (up to 5 parcels per shipment in ShippyPro) and bulkier or heavier goods.
- DPD - Out of Europe: destinations outside the standard European coverage, such as the Canary Islands.
- Tariff Code: your three-digit BRT tariff code (codice tariffa) for the network selected above. BRT gives you one code per network together with your API credentials, for example 000 for Italy, 004 for EuroExpress, 301 for DPD. Your codes may differ. If you don't have it, ask your BRT branch for your "codice tariffa".
- Goods Handling: BRT's codice trattamento merci, a two-character code BRT assigns when your goods need a specific handling agreement (for example 7Q). Fill it in only if BRT gave you one.
- Automatic: each shipment is confirmed to BRT as soon as you create the label (BRT calls this autoconferma). It's the simplest and fastest method, but you can't edit a shipment afterwards.
- Manual: shipments are sent to BRT only when you close the work day (End of Day). Shipping Confirmation (default: Manual): how shipments are confirmed to BRT.
⚠️ Shipping Confirmation must match BRT's setup. Choose the mode BRT activated for your API access (your Transmission choice, if you requested activation through ShippyPro). If your shipments stay on the hourglass in Shipped Orders, a mismatch here is the usual cause.
-
Send SMS and email to the recipient: BRT sends your recipient email and SMS updates about the delivery, using the email and mobile number on the order, so make sure your orders include them. This can be a paid extra in your BRT contract: check with BRT.
- Vertically flip the label orientation: rotates the label 180 degrees. Turn it on only if your labels come out upside down.
- Send the original sender (order sender address) to BRT: turn it on if you ship on behalf of others (for example as a logistics provider, or for several brands) and want the label and waybill to show the sender from the order instead of the company name registered with BRT. Ask your BRT contact to enable mittente originale on your account first, otherwise BRT keeps printing your registered name.
- Pickup Account Number: only needed to book BRT pickups from ShippyPro. It's your BRT codice cliente ritiro: your customer code followed by a three-digit number (e.g. 0123456001). Ask your BRT branch for it.
- POD SFTP Host: only if you want ShippyPro to collect BRT's proofs of delivery (POD), the images of signed deliveries. First ask your BRT contact to enable POD delivery via SFTP on your account. BRT then gives you SFTP access details: enter the SFTP host (server address) here.
Enter the IP address or host name without the protocol. To use a non-default port, add :your-port after the host.
Once you enter a host, more fields appear. Fill them in with the details BRT gave you:- SFTP Username (required): the SFTP username.
- SFTP Password (required): the SFTP password.
- SFTP Directory: the folder on the SFTP server where BRT puts your POD files, if BRT gave you one.
- POD File Extension (required): the file format of BRT's POD files: JPG, TIFF or PDF. Choose the format BRT sends you.
Need more than one BRT connection?
One connection uses one network and one tariff code. Create a separate BRT connection when you need:
- more than one network (for example Italy and EuroExpress);
- the DP5 label type, which needs its own connection on the DPD network;
- more than one BRT price list.
Repeat the steps above for each one.
3. Additional features
Destinations
- National: Available: Italy
- International Available
Options
- Label PDF: A4, A6
- Label ZPL Available
- Label EPL Not Available
- DP5 (only with ZPL and DPD network)
- Track & Trace Available
- Paperless Not Available
- PickUp/DropOff (PUDO) Available
- Cash On Delivery Available
- Live Rates Not Available
- Return Labels Not Available
- Return Labels (in the box) Not Available
- Book/Schedule Pickup Available
- Address Check Not Available
- Carrier Options Available
- Proof Of Delivery (POD) Available
- Insurance Available
- Multiparcel Available
- Delete Shipment (Void) Available
- CloseOut Available
- CN22 Not Available
- CN23 Not Available
Carrier Options
-
pin_code (text) – PIN Code Authorization
-
delivery_date (text) – Required Delivery Date
-
authorized_neighbor (text) – Neighbor Mandatory Authorization
-
floor_delivery (checkbox) – Consegna al piano
-
appointment_delivery (checkbox) – Consegna su appuntamento
-
assegnoadata (checkbox) – Assegno a Data
-
pointid (text) – BRT Point ID
-
pallet_type1 (select) – Pallet Type
- Available values: EPAL and EUR
- Send the info about pallet type to BRT electronically, as paper requests are no longer accepted. If not provided, BRT won’t accept the pallets.
-
pallet_type1_number (text) – Number of pallets of the selected type
-
various_particularities_management_code (text) – Various Particularities Management Code
-
particularities_delivery_management_code (text) – Particularities Delivery Management Code: usa questa opzione se desideri creare una spedizione con Ritiro Contestuale, previa abilitazione del Corriere, potrai valorizzare l’Opzione Corriere particularitiesDeliveryManagementCode inserendo il codice “RC”:
-
particularities_hold_on_stock_management_code (text) – Particularities Hold On Stock Management Code: usa questa opzione per fornire istruzioni specifiche su come gestire le stock holdings con il corriere inserendo il codice causale desiderato.

-
cod_type (select) – BRT COD Type
Available values:- BM – Bank check made out to the sender
- BP – Non-postal check made out to the sender
- CM – Banker's check made out to the sender
- OC – Original check made out to the original sender
- OM – Original check made out to the original sender
- TM – Cash On Delivery (COD) with a specified date
-
expiry_date (text) – Expiry Date - Required for Fresh Service - Format Y-m-d
How to Handle a BRT Hold-for-Pickup (Fermo Deposito) Shipment
Currently, it is not possible to select "Hold-for-Pickup" as a destination in the courier options.
This is because the BRT webservice does not support this feature.
To work around this limitation, we recommend the following steps:
-
Replace the recipient’s address with the address of the BRT branch where the parcel will be picked up.
-
Enter the name of the customer who will collect the parcel in the recipient’s details.
-
Add “Fermo Deposito” in the “Courier Notes” field to inform the courier.
Label design
-
DP5 - available for barcode and text
-
ZPL - available for barcode, text, second_text, logo_url
For more info click here.
Label printing options
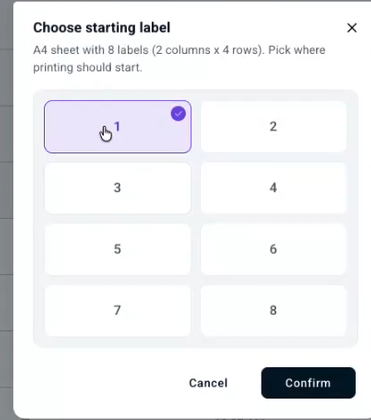
You can print 8 BRT labels on a single A4 sheet by selecting your orders from the Shipped Orders section and clicking on Print BRT A4 8 labels.
You can select which position to start printing from (1–8) when using the "Print BRT A4 8 labels" command — so you can reuse partially used sheets instead of wasting labels.
How it works:
- Layout follows the real sheet format: 2 columns × 4 rows (position 1 = top-left, position 8 = bottom-right)
- The starting position defaults to 1
- Labels then print sequentially from the chosen position
At the moment BRT does not offer the possibility to add a Notes field on the label.The Address 1 field has a limited space of 35 characters.
Returns
To proceed with returns, first select the Return From Shop option from the additional services menu in Carriers > BRT > Edit.
Then add the Return Depot Code provided by BRT in the Return Deposit field.
You can then start shipping your returns by following the steps in this guide.
📌 If the label you get has a duplicated sender's name on it please get in touch with your BRT representative in order to ask them that the sender name on the label is chosen from originalSenderCompanyName when using return from shop.
How can the customer book a pickup of a return shipment?
If you have chosen in the Easy Return rules to charge the return shipping costs to your company and not to the end customer, you can show the button to book the pickup in the email with the return instructions. Simply go to Easy Return > Email Template > Vendor Charged and click on "Show Book Pickup Button".

If the option is flagged the customer fills out a return request form which goes directly to BRT, if it is not flagged the customer will be asked to call BRT to book a pick-up.
Returns from Fermopoint
To use the service, you will first have to have this option enabled by the Carrier, then select the list of BRT services from Carriers > BRT > Edit the "Return from shop" field and enter the "Return depot" agreed with the Carrier.
Some rules to consider to ship to and from Fermopoints:
-
Weight less than 20 Kg
-
Volume less than 0.2 m3 (longest side less than 1m)
-
Shipments must not be Cash on Delivery or collected invoice
-
They must not have any special delivery instructions (e.g. telephone contracts)
-
Email or "mobile" telephone number of the recipient or sender of the return are required
For returns, there is no need to pre-select the pickup point requested by the customer when creating the label. Once the customer has the label, they can go directly to the most convenient pickup point to drop off their package.
BRT PUDO Fermo Point
Want to ship to BRT Fermopoints or automatically identify pickup-point orders from Shopify? Here's how to configure the connection and check the details imported with your orders.
Set up your Fermopoint connection
- Add an additional BRT connection using the connection instructions above.
- Enter the Fermopoint tariff code assigned by BRT in Tariff Code (optional). If BRT has assigned code 300 for your Fermopoint shipments, enter 300.
- Use your normal BRT connection credentials.
You do not need an additional BRT API key or PUDO token in this connection. For the Atlas integration, use an API key generated in ShippyPro instead. Follow the Atlas Pickup Points guide for its setup.
Import pickup-point details and assign the carrier
Importing the point selected at checkout and assigning the Fermopoint carrier connection are two separate tasks. To automatically import pickup-point details from Shopify checkout, use a supported app such as Atlas or Globe. Separately, Automation can assign the carrier connection if your orders import a distinctive Delivery Option.
- Place a test Shopify order with a pickup point selected, or wait for a real pickup-point order to import.
- Open the order's characteristics in ShippyPro.
- Check the imported Delivery Option value.
- Configure your Automation condition using the distinctive value you verified.
If needed, configure Shopify to pass specific wording for pickup-point orders. For example, if the imported value is PUDO, your workflow can use the Imported Orders trigger, the condition Delivery Option = PUDO, and an action that assigns your BRT Fermopoint connection. Use the actual imported value, not PUDO unless that is what your store sends.
For workflow configuration, see How Automation works.
📌 Note: Leave orders used for inspection unshipped, without generating a label. If PUDO information is missing, check that the Shopify webhooks for importing it are correctly activated, then import a new test order to inspect.
⚠️ Important: An imported pickup-point address does not replace the required BRT pickup-point Carrier Option. Check that this option is completed before creating the label. Assigning the Fermopoint connection through Automation does not replace this requirement either.
To select the point manually, follow the Add options and Point steps below.
For automatic transmission of pickup points selected at your Magento checkout, your IT team must develop a custom module. See the Checkout setup guide for integration instructions.
The Fermo Point solution for BRT is available on ShippyPro, exclusively supported by the REST API solution.
How do I add a BRT Fermo Point to my shipments?
You can select a Fermo Point in two ways, depending on how you create your shipments.
1. From the platform
You can select the Fermo Point when creating the shipment from the To Ship section:
- Open the order you want to ship.
- Before shipping it, click Add options.
- Select Point.
- Choose the pickup point you want.
- Proceed with the shipment.
2. Via API
If you create shipments through the ShippyPro API, enter the Fermo Point ID in the CarrierOptions parameter of the Ship call.
Remember, shipments via FermoPoint have the following restrictions:
-
Maximum actual kilograms supported: 20 kg
-
Maximum volume supported: 0.2 m3
-
The longest parcel side must be less than 100 cm.
-
Cash on Delivery is not supported
-
The recipient's telephone number is mandatory
The FermoPoint label contains the Company Name and not the name of the recipient.
BRT PUDO FermoPoint is not yet available for international shipments in the European network.
Returns
To proceed with returns, first select the Return From Shop option from the additional services menu in Carriers > BRT > Edit.
Then add the Return Depot Code provided by BRT in the Return Deposit field.
You can then start shipping your returns by following the steps in this guide.
Rates
BRT does not transmit Live Rates to ShippyPro. If you’re interested in comparing prices, it is therefore mandatory to enter your zones, weight and price lists.
ShippyPro automatically inserts main zones, generic weights and adds the prices in 0 (zero) amount. You will be able to ship with BRT even though you leave the prices in 0, it will not affect your contract with the carrier.
Follow the next steps only in case you want to compare prices with other carriers.
Follow the steps indicated in this guide carefully: How to set Carrier Rates
If you use more than one BRT price list, no problem! You will be able to add a new connection for each tariff.
To do this, you don't need to add your BRT credentials again.
Click on the BRT icon again to connect it. Inside the pop up, click on the search bar: Select from a carrier already entered and choose the connection with the same credentials you previously connected.
If you wish to change the estimated delivery days shown when choosing the Carrier, you can do so by editing the values of the fields “Delivery days - min” and “Delivery days - max” from Carriers > BRT > Edit Prices.
Tracking
The BRT API label will produce a Parcel ID: once the label has been read and confirmed by the Carrier, this will create the final tracking that will be automatically acquired by ShippyPro via API.
❓ Why does the BRT tracking code I copied into Shopify stop working?
Have you created a manual BRT shipment and copied the tracking code from its label into Shopify? Here's why that code can later stop working, and when to share tracking with your customers.
BRT generates three tracking codes for each shipment: an initial 18-digit code, available when you create the label, a 15-digit code and a 12-digit code. The initial 18-digit code later becomes inactive and is replaced by the other codes. This is why a code copied from the label can stop working.
❓ When should I copy or share tracking for a manual BRT shipment?
- Wait at least until you receive the 15-digit tracking code.
- Copy that code into Shopify.
- Use that code when sharing tracking with the recipient.
📌 Note: The 15-digit code is generally generated and received in the evening. This is not a guaranteed time. When you manually copy a code into Shopify, do not assume it will be replaced automatically.
⚠️ Important: Marking an order as Delivered does not make an inactive tracking code usable. It does not solve tracking for a shipment that is still in transit.
If your BRT tracking starts with SHP, see Why does my BRT/Bartolini tracking start with SHP? (the guidance is available in Italian).
For the creation steps, see How to create a Manual Shipment. To configure emails to your recipients, see How to set up Email Notifications.
-
Disable automatic updates by navigating to Marketplace > Edit.
-
Do not send a manual update after performing this action!
Good to know 💡
-
Orders merged via Merge Orders will not be able to receive evening tracking.
-
DPD tracking for shipments to Europe cannot be obtained via API. But do not worry! With BRT tracking you can also track shipments made with the DPD network.
-
Magento does not support our Track & Trace updates, for this reason you will not find them on the marketplace.
-
If the status of your in-transit shipments is still ‘Unknown’ (or ‘No Events Yet’) in the platform, check that the credentials entered in the BRT connection are correct and that the End of Day setting is aligned with what you previously agreed with the Courier (Manual or Automatic)
The code shown in Shipped Orders represents the 15-digit package ID, automatically created by the Courier.
The tracking number transmitted via our emails consists of 18 characters. BRT first generates an 18-digit code and then updates the tracking to a 12-digit code. This explains the difference between the information available on their site and ShippyPro.
If the order is not present on our portal and there is no connected marketplace, it will not be possible to update it with the second tracking number. In this case, you should connect the marketplace on the platform, import the orders (or create them with the PutOrder API > API folder) and then ship them using the marketplace order number.
Hydraulic Lift Table
4. Errors & Troubleshooting
If you're experiencing any issues with BRT connection or label creation, please visit this link with the most frequently asked questions and troubleshooting:
How to fix BRT errors (Italian only)
What you can do with BRT in ShippyPro
Here's what the BRT integration supports in ShippyPro.
- Features: Drop-off and pickup points, Cash on delivery, Pickup booking, Proof of delivery, Insurance, Shipment cancellation, Multi-parcel shipments, Tracking, End-of-day close-out
- Label formats: ZPL, PDF, DP5
- Service types: Servizio Standard, Servizio Priority, Servizio 10:30, Servizio Distribuzione
- Countries: All countries
💡 Missing something? If you need a service or feature that isn't listed here, or would like more information, get in touch with us: we're here to help and can look into adding what you need.