New Email Notifications are now in Beta!
With ShippyPro, you can automatically send email notifications to keep your customers informed at every step of the delivery journey. In today's market, customers demand real-time delivery updates and the lack of proactive communication leads to increased "Where Is My Order?" (WISMO) support tickets and failed delivery attempts.
ShippyPro's new email notifications are designed to solve these challenges by giving you full control and flexibility over when and how you communicate with your customers. Unlike traditional email notifications that often go ignored or overwhelm customers with unnecessary messages, our workflow-based system ensures you send the right message at the right time.
Key benefits:
- Reduce WISMO tickets — Keep customers informed proactively, reducing support workload
- Prevent failed deliveries — Alert customers before delivery attempts, reducing re-delivery costs
- Increase customer satisfaction — Build trust and improve NPS scores with timely, relevant updates
- Full brand control — Create fully customized email templates that reflect your brand identity
Start now at: https://app.shippypro.com/notifications
Summary:
- What Are Email Notifications
- How to Activate Email Notifications
- How to Configure Your Email Server
- How to Use Email Notifications
- Unsubscribe link
- Troubleshooting & FAQ
1. What Are Email Notifications
Email notifications allow you to keep your customers informed through professional, branded emails that notify them of changes in their order status. Unlike generic, one-size-fits-all emails that customers often ignore, ShippyPro's email notifications are workflow-driven and contextual — meaning you send only the updates that matter, when they matter.
With full control over design, layout, and content, you can create a communication experience that reflects your brand identity while addressing common e-commerce challenges:
- Reduce "Where Is My Order?" inquiries by proactively updating customers
- Prevent failed deliveries by alerting customers when action is needed
- Build customer trust with timely, relevant updates instead of message overload
- Enhance brand recognition with fully customized templates
With email notifications, you can:
- Send updates at any stage of the delivery journey based on precise tracking statuses
- Fully customize templates with your logo, colors, and messaging
- Add images and personalized content using dynamic placeholders
- Include tracking links and call-to-action buttons
- Support multiple languages (English, Italian, French, German, Spanish)
- Control exactly when notifications are sent using flexible workflow conditions
2. How to Activate Email Notifications
ShippyPro's new notification system is built on workflow-based configuration — giving you an easy, no-code way to set up notifications aligned with your business logic. Unlike older systems that sent too many messages without control, you now have complete flexibility to choose exactly when and which notifications to send.
To start sending email notifications:
- Connect your email server
Configure the SMTP server your customers will receive notifications from (e.g. orders@yourstore.com) - Prepare your templates
Create and customize your email templates with your brand elements - Set up your workflows
Define triggers and conditions to send notifications automatically based on precise tracking statuses
This approach ensures you send only valuable updates that customers actually want to receive, helping you avoid message fatigue while keeping customers informed.
⚠️ Important: Some carriers provide email notification options directly. To avoid sending duplicate notifications to your customers (which can lead to confusion and negative experiences), make sure to disable the carrier's native email notification option before enabling ShippyPro Email Notifications.
3. How to Configure Your Email Server
⚠️ For the new version of Email Notifications only, email server is required to send email notifications from the new version of Notifications. ShippyPro's default sender (no-reply@shippypro.com) will no longer be available. If you haven't set up your own email server yet, follow the steps below.
To send email notifications, you need to connect your own email server. Emails will be sent from your own address (e.g. orders@yourstore.com), not from ShippyPro.
This gives you:
- Emails sent from your own domain, not ShippyPro's
- Higher deliverability and open rates
- Customers recognize your sender address
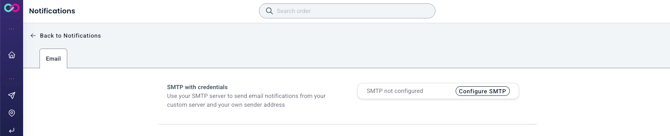
To set up your custom SMTP server:
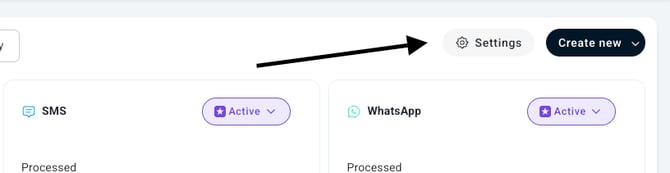
- Click on "Settings" button at the top-right of your screen to access the Email Settings
- Click on "Configure SMTP"
- Enter your SMTP server details:
- Label Enter any name to identify this server in ShippyPro
- Hostname (e.g., smtp.gmail.com)
- SMTP Username (your email address)
- SMTP Password (your email password or app-specific password)
- Port (e.g., 587 for TLS, 465 for SSL)
- Sender name (your company or brand name)
- Sender address (the "from" address customers will see)
- Save your settings and send a test email to confirm everything works
Note: Only one custom SMTP server can be configured per account.
SMTP server plugin is not compatible with MFA authenticated email servers.
4. How to Use Email Notifications
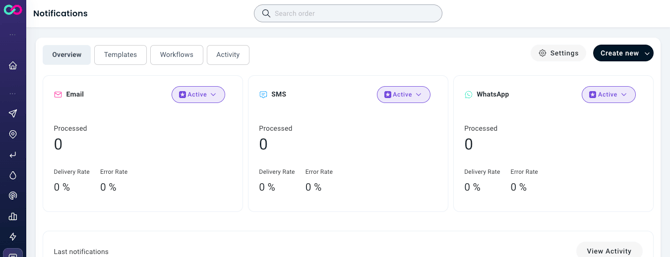
a. Overview
The Notifications dashboard provides:
-
Metrics cards — Show the status of your email notifications and provide metrics to monitor usage.
-
Last notifications table — Displays the most recent email notifications, their delivery status, and details. This gives you full visibility on recent communications sent to your customers.
b. Templates
From the Templates section, you can create, view, and manage all your email templates. ShippyPro provides a default template to help you get started quickly.
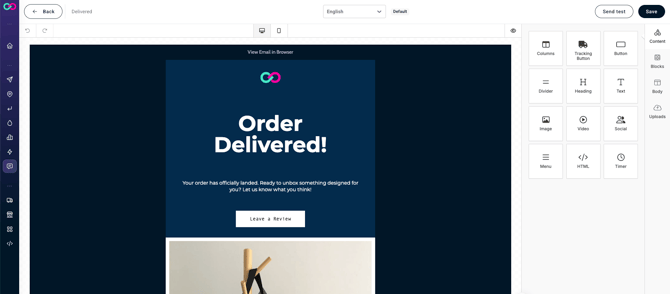
Email Template Features:
- Full customization: Design your email layout, add your logo, customize colors, fonts, and styling
- Content blocks: Add columns, buttons, headings, text, images, videos, social media links, menus, HTML, and more
- Dynamic placeholders: Insert order-specific information that updates automatically:
- transaction_id — The reference number of the order (e.g. ORDER-123)
- carrier_name — Name of the shipping carrier (e.g. UPS or FedEx)
- tracking_code — Tracking number for shipment monitoring (e.g. TRK123423)
- from_address_company — Name of the sender company as configured in the Sender details of the shipment (e.g. ABC Company)
- from_address_name — Name of the person sending the shipment as configured in the Sender details of the shipment (e.g. Paula Smith)
- to_address_company — Name of the company receiving the shipment as configured in the Recipient details of the shipment (e.g. XYZ Company)
- to_address_name — Name of the person receiving the shipment as configured in the Recipient details of the shipment (e.g. John Doe
- marketplace_platform — Marketplace where the order originated. It's equal to the label of your marketplace connection (e.g. Shopify)
- Multi-language support: Create templates in English (default), Italian, French, German, and Spanish
You can easily add more languages from the template page. Click the Language dropdown at the top of the template builder.

Then, select Add language and Choose the languages you want by clicking the + icon next to each one.
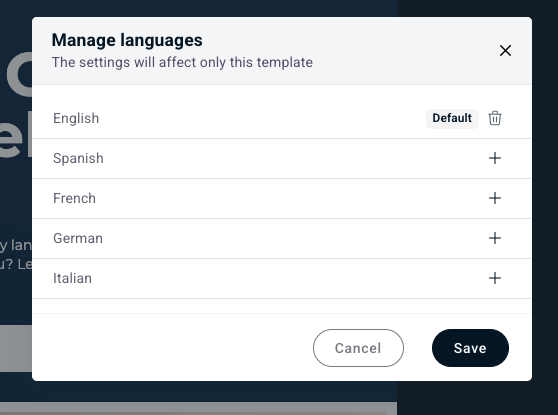
A new version of the template will be created for each added language, with the layout copied from the default. You’ll just need to translate the text strings.
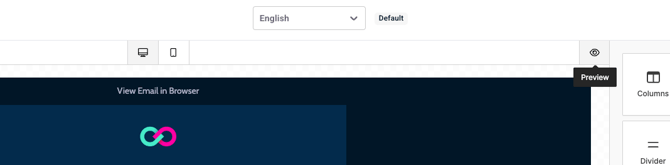
- Preview modes: View how your email looks on desktop and mobile devices by clicking on the Desktop and Mobile icons. You can also access the preview mode by clicking on the Eye icon on the top-right of the template
- Test functionality: Send test emails before going live
- Image uploads: Add custom images to enhance your emails
Creating a New Template:
- Click Create new > "New Template"
- Choose "Email" as the channel
- Use the visual editor to customize your template:
- Drag and drop content blocks
- Add your logo and brand images
- Insert dynamic placeholders for order information
- Customize text, buttons, and calls-to-action
- Preview your template on desktop and mobile
- Send a test email to verify appearance and content
- Save your template
c. Workflows
The Workflows section gives you complete control over when and how email notifications are sent. This is where ShippyPro's new notification system truly shines — instead of bombarding customers with every status update, you can create automated workflows based on granular tracking statuses that trigger only when updates add real value.
Why Workflow-Based Notifications Matter:
- Reduce support workload — Proactive updates mean fewer "Where Is My Order?" tickets
- Prevent failed deliveries — Alert customers at critical moments (e.g., delivery attempts) to ensure successful delivery
- Improve customer satisfaction — Send timely, relevant messages instead of notification overload
- Align with your business logic — Create rules that match your specific fulfillment processes
Setting Up a Workflow:
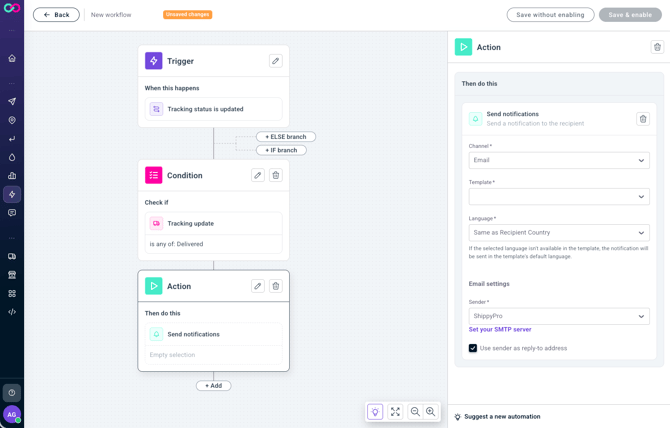
-
Choose a trigger - Select what initiates the notification:
- Tracking status is updated - When the carrier sends a new tracking update about the shipment, an email will be sent to the recipient
- Order is imported - When the order is imported in ShippyPro, an email will be sent to the recipient
- Shipment label is created - When the label is generated in ShippyPro, an email will be sent to the recipient
- Order in error - When the label creation fails, an email will be sent to the recipient
💡 Keep in mind that when orders are imported and shipment labels are created, not all order information may be available for every shipment. For example, the tracking code won't be available until the shipment has been shipped.
-
Add conditions (optional) — Refine when the notification is sent using precise information about the shipment:
-
- Specific tracking status (e.g., "In Transit", "Out for Delivery", "Delivered") or granular statuses (e.g. "Wrong/Invalid address", "Available at PUDO/Facility")
- Specific carrier
- Specific store or marketplace
- Many others
-
- Select the "Send Notification" action
- Configure notification settings:
- Channel: Email
- Template: Choose your customized email template
- Language:
- Same as Recipient Country (automatic) — If the shipment goes to Italy, the notification will be sent in Italian
- Force specific language — Choose English, French, German, Spanish, or Italian
- Email settings: Your configured email server will appear as the sender. If you don't see it, make sure you've completed the setup in Step 3 and refreshed the page.
Example workflows that deflect support tickets:
- Order Shipped: Send a "Your order is on its way" email when tracking status changes to "In Transit" — reduces "Has my order shipped?" inquiries
- Out for Delivery: Notify customers when their package is out for delivery today — sets clear expectations and reduces failed delivery attempts
- Delivery Attempt Failed: Alert customers immediately when a carrier attempts delivery without success — prompts them to reschedule or arrange pickup, preventing re-delivery costs
- Package Delivered: Send a confirmation email with a request for feedback — builds trust and encourages repeat purchases
- Delayed Shipment: Proactively inform customers about delays before they contact support — maintains trust even when issues arise
💡 Pro Tips:
- Create workflows that target high-impact moments where customer action or awareness is needed
- Use conditions to send different messages based on carrier performance or product type
- Avoid sending notifications for every minor status change — focus on updates that genuinely matter to customers
- You can create multiple workflows for different scenarios, carriers, or customer segments to provide a tailored communication experience that scales effortlessly as your business grows
5. Unsubscribe link
All email notifications now include an unsubscribe link that allows recipients to opt out of notifications for a specific order. When a recipient clicks the unsubscribe link, they will no longer receive email notifications for that particular order, but they will continue to receive notifications for other orders.
6. Troubleshooting & FAQ
To which email address are notifications sent?
Email notifications are sent to the recipient's email address provided in the order details.
How can email notifications help reduce my support workload?
Email notifications are proven to significantly reduce "Where Is My Order?" (WISMO) support tickets — one of the most common customer service inquiries in e-commerce. By proactively updating customers at key moments in the delivery journey, you eliminate the need for them to contact support.
Best practices to deflect WISMO tickets:
- Send a notification when the order ships (with tracking link)
- Alert customers when the package is out for delivery
- Notify immediately if there's a delivery attempt failure
- Confirm successful delivery
Many merchants report a 30-50% reduction in support inquiries after implementing proactive email notifications with ShippyPro's workflow-based system.
Why might emails not be delivered?
Email delivery issues can occur due to:
- Invalid or missing email address — The recipient's email is incorrect or not provided in the order
- Spam filters — Emails may be caught by the recipient's spam filter
- Issues with order status updates — The trigger condition may not have been met
- SMTP configuration errors — Double-check your credentials
- Recipient's inbox full — The recipient's mailbox may be full or blocked
How can I check if an email was successfully delivered?
You can monitor email delivery status in the Activity page:
- Go to Notifications > Activity
- View the list of sent notifications
- Check the status of each email:
- Sent — Email was successfully sent
- Failed — Email delivery failed (click for details)
- Pending — Email is queued for delivery
The activity logs provide detailed information about each notification attempt, including timestamps and error messages if delivery failed.
Can I use images in my email templates?
Yes! You can upload custom images directly in the template editor. Use the Image content block to add your logo, product images, or promotional banners.
Do I need technical knowledge to set up a custom SMTP server?
Basic knowledge of email server settings is helpful. You'll need to know your SMTP host, port, and credentials. Most email providers (Gmail, Outlook, etc.) provide this information in their support documentation. If you're unsure, contact your email provider's support team.
Can customers reply to email notifications?
Either you use ShippyPro's default server or a custom SMTP server, you can choose to enable "Use as reply-to address," customers can reply directly to your configured email address, allowing for two-way communication.
Can I send different email templates based on the carrier or store?
Yes! Use workflow conditions to create specific email experiences:
- Create multiple workflows
- Add conditions for specific carriers or stores
- Assign different email templates to each workflow
This allows you to customize messaging based on shipping method, marketplace, or customer segment.
How can I send a test notification?
You can send a test notification from the template page. You can click on "Send test" button to insert an email address and send a test notification to the email address.
How can I configure a multi-language template?
You can easily add more languages from the template page. Click the Language dropdown at the top of the template builder, then select Add language. Choose the languages you want by clicking the + icon next to each one.
A new version of the template will be created for each added language, with the layout copied from the default. You’ll just need to translate the text strings.
I’ve just started using Notifications, but why are they all showing as Failed?
Check if you see this banner saying your Account is under review. This is a standard verification step and our team will review their account within 1-2 business days. Once approved, everything works as normal.

Multiparcel shipments
Currently for multiparcel shipments a single email is sent with the main tracking number
Notifications about Amazon shipments
Please note that we cannot guarantee any consequences or actions that Amazon may take as a result of sending communications to the buyer. We claim no responsibility for anything that might occur due to notifications sending. Our customers bear the exclusive responsibility for the use and management of the "Leave a Feedback" function as well as for set-up of the relevant parameters (including but not limited to the number and categories of e-mail recipients) and e-mail content. Therefore we have no responsibility in relation to your, your representatives', employees' and collaborators' and/or third parties' use of this function nor in relation to compliance with the rules of Amazon and/or any other marketplace where you operate.
Please read the Communication guidelines carefully and add no-reply@shippypro.com as a sender following Buyer-Seller Messaging Permissions