How to connect Prestashop on ShippyPro
Learn how to connect Prestashop step by step
As for other marketplaces, connecting your Prestashop Account to ShippyPro is really simple.
Follow these quick steps to start shipping your orders in a few minutes!
Summary:
1. Before you start
We support Prestashop version from 1.4.0 up to 8.2.1
Prestashop version 1.6 is not compatible with PHP 7.2.
Indeed, Prestashop 1.6 is end-of-life and Prestashop will soon stop support for it.
In this case you should upgrade PHP to 7.1/7.0 or upgrade Prestashop to version 1.7.
-
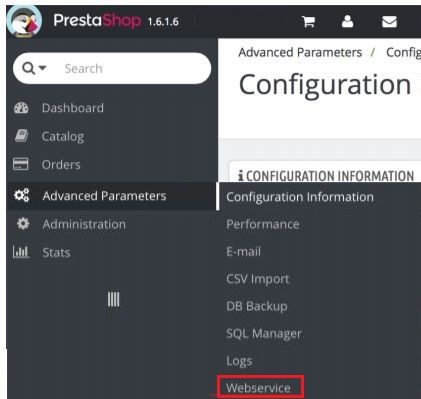
Login into Prestashop, then click on Advanced Parameter > Webservice.
-
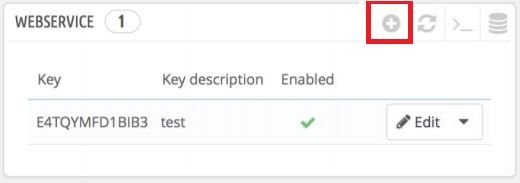
Add then a new Webservice by clicking on the ✚ icon:
-
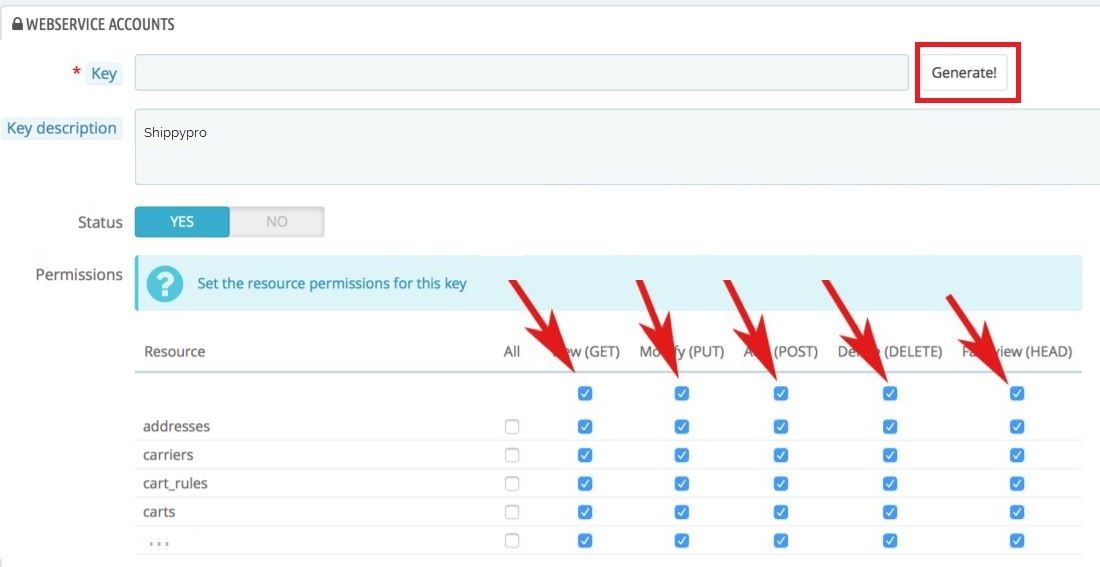
Click on Generate and type “ShippyPro” inside the Key description field. Tick all the columns by clicking on the first check for each one.
-
Copy the Key you receive and go back to ShippyPro.

2. Connection steps
-
Login into your ShippyPro Account and click on Connections > Marketplaces. Find the Prestashop logo and click on it.
-
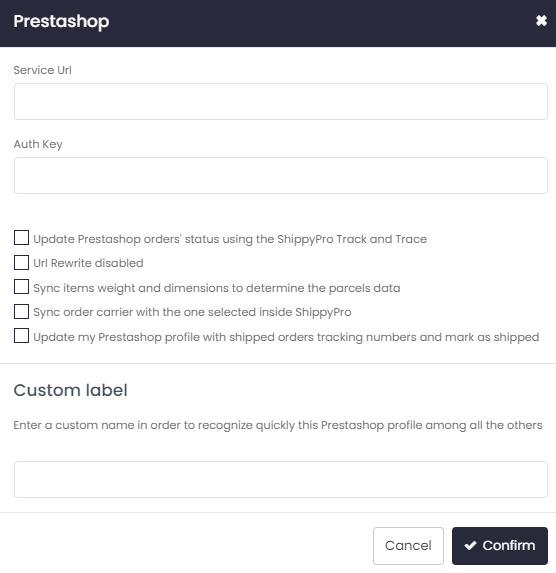
Insert your Prestashop domain URL, which usually corresponds to the complete homepage URL of your site e.g. https://www.shippypro.com, without /shop.html or similar and paste the Key.
Please remind to also add https:// before your URL.
Note: you need to add your production live URL, any under maintenance website URL won't be accepted.
3. Additional options
Then decide whether to select one or more of the following options:
-
Url Rewrite disabled - try this option if your URL / API seems not to work for the connection.
-
Sync items weight and dimensions to determine the parcels data - Weights and dimensions of your orders added on Prestashop will automatically be imported on ShippyPro.
- You need to add them to your Marketplace in order to be imported and be shown during the creation of the shipment. NB: if the value of dimensions is zero, these will be valorized by default with the values you set in My Parcels, since valid dimensions (other than zero) are required for import.
- If the order contains several items - even if they are different and have different SKUs - the result will always be one single parcel (by multiplying the volume and weight by the quantity)
- If you wish to create more parcels for different items, or create customised parcels, you can remove the option ‘Sync items weight and dimensions to determine the parcels data’ and configure SKU rules from the My Parcels section (all changes will be effective from the next imported orders)*
- *if the option ‘Sync items weight and dimensions to determine the parcels data’ is also enabled, this will take priority over the My Parcels section
-
Sync order carrier with the one selected inside Platform
Check this option if you would like to update the Prestashop carrier ID based on the ShippyPro carrier used to ship the parcel.
This means that the carrier name configured on the marketplace will be overwritten with the carrier's name present in ShippyPro every time you create a shipment and we send the update to the marketplace. -
Update my Prestashop profile with shipped orders tracking numbers and mark as shipped - to update your marketplace with tracking information and mark the order as shipped.
-
Once the connection has been established you can then choose among the different Status (here called Folders) of the orders to be imported on ShippyPro, some examples are:
- Payment accepted
- Processing in Progress
- Pending
- Awaiting Payment

To select more folders you should use CTRL. ShippyPro will automatically import your orders every 10 minutes.
If Folders view is not available in your connection module it means the connection has not been established correctly.
Please check your URL and Auth Key and try to do the connection from scratch.
If nothing changes please contact us.
-
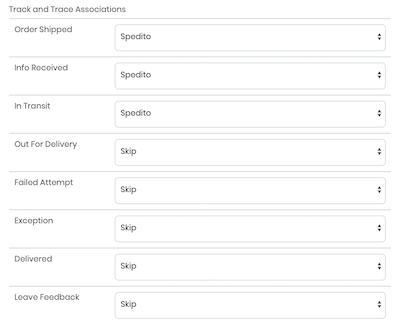
By selecting “Update Prestashop orders’ status using the ShippyPro Track and Trace”, it will appear a list of Status also present in our Track&Trace section to be assigned to your Prestashop Status.
This allow ShippyPro to automatically update Prestashop with the right orders statuses.
For each ShippyPro order status, select the corresponding Prestashop orders status you previously added. If you'd like to know more about the exact meaning of each ShippyPro order status, read this detailed article.
You'll now be able to map the different Status chosen on ShippyPro directly on your Prestashop when you'll receive a tracking update.
-
Choose the type of order number to be imported on ShippyPro:
Choose the type of Prestashop order number to import in ShippyPro from Order ID and Order Reference:
Note: Once the connection modal is finalized, this choice cannot be altered. If you wish to change your selection, you will need to delete the current Prestashop connection and create a new one with your desired option.
Don't forget to save your changes by clicking on Confirm.
And what if the statuses are not being correctly updated on my marketplace even after configuring them in Track & Trace?
To ensure a smooth communication between Prestashop and ShippyPro, we recommend creating a rule in your Firewall based on the header “User-Agent: ShippyPro”.
Please also note that status updates took place every 8 hours and only the most recent update will be shown:
E.g. if the system checks the tracking and the last status is already delivered instead of in transit, only “delivered” status will be sent to Prestashop.
Tip: Prestashop gives you the possibility to create Custom Status. If you want, you can easily set your tracking system directly on your marketplace.
If ShippyPro succeeds in establishing the connection, a confirmation message will appear. Then you should click on Edit and select the folders from where you would like to import orders.
ShippyPro only imports Processing orders from Prestashop and they'll be displayed in To Ship section for up to 20 days.
4. Errors & Troubleshooting
Are you facing some issues during the connection? Please visit the following page:
Are you facing some issues during the importation? Please visit the following page:
