You can include our Drop Off point Map by inserting a few strings of code inside your custom website.
Summary:
1. Before you start
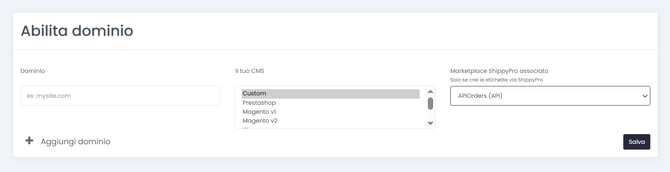
First of all, go to Checkout > Advanced Settings.
You'll find a section called Enable Domain: insert your Domain and CMS information and select the Marketplace associated to ShippyPro to be able to include Map Point details on your labels.
-Apr-15-2024-09-06-25-4355-AM.gif)
If you are not using a specific marketplace, you can use Checkout with APIOrders and Custom CMS:
2. Configuration process
What you have to do is to copy the first line of the script, in fact the others are optional and they would allow you to see the info of the Drop Off Point, if you'd like to.
Note that the custom website has to be live to display Drop-off Points.
Once copied it, just put the script inside the body tag of your website according to where you want to show the map.
-1.png)
If you receive error Access to script at https://www.shippypro.com/maps/mapsDropOffPoints.js. from origin '***' has been blocked by CORS policy: No 'Access-Control-Allow-Origin' header is present on the requested resource. GET https://www.shippypro.com/maps/mapsDropOffPoints.js. is net::ERR FAILED 200 (OK) remove "integrity" and "crossorigin" from the embedding link:
Right underneath the Script you can find some Attributes to be included in order to personalize the Drop Off Point Map.
For example, if you'd like to add a Callback when a customer picks a drop-off, you need to write inside the Script (adding it as a string):
<script maps src=“https://www.shippypro.com/maps/mapsDropOffPoints.js” key=“481d4e831e00000000007dc94090d4cb” zip=“50122” callback=“callbackFunction”></script>
You can use the API GetDropOffPoints and GetRates calls or develop the Checkout integration from > Maps Setup e Advanced setup
3. API ChoosePoint
-
Shipping via API: pass the Point ID in the corresponding CarrierOption field of the Ship call;
-
Shipping via platform: an additional API call, ChoosePoint, is necessary to accurately link the selected drop-off point with the incoming order. This process guarantees that the PUDO Carrier option is automatically pre-selected when creating the shipment, eliminating the need for manual selection.
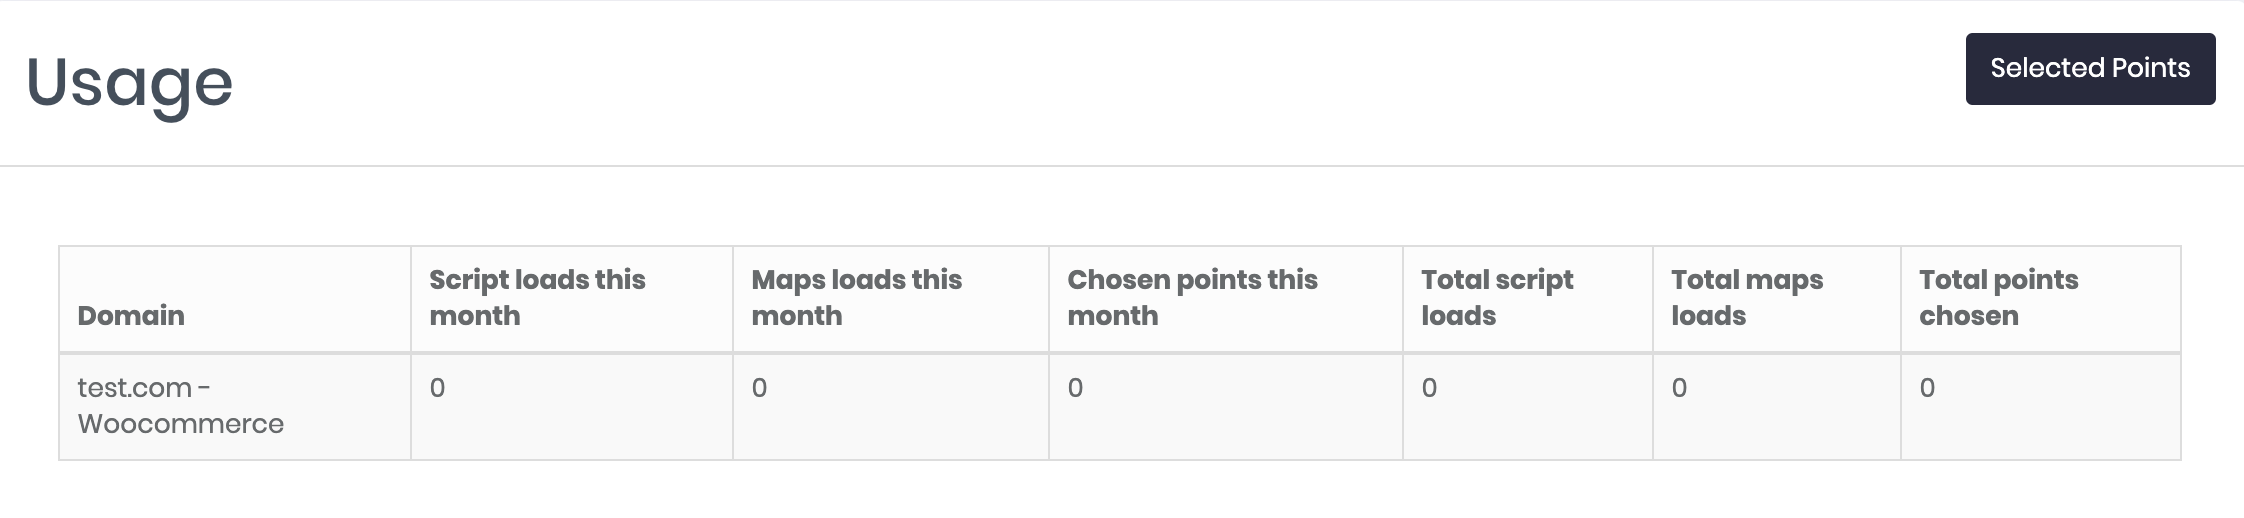
4. How to manage Map Pricing
Go to Checkout > Pricing and Usage. At the top left you’ll see yours Current Plan, Maps Loads, the amount of Loads remaining, as well as Length of the Plan.
Usage section will show you how many times your Customers used your Map.
Domain: shows the name of the marketplace of reference for the following data:
-
Script Loads this month: counts the times your script has been loaded for the current month. It's different from:
-
Maps Loads this month, that instead counts the times an address has been added and looked for.
-
Chosen points this month counts the points that have been used by the customers for their shipments.
-
Last 3 columns show you the total amount of script loads, maps loads and point chosen since the first use of Maps.
Now, clicking on Selected Points, there will be shown the details for all the points selected by the customers
If you need more information on how the pricing works, click here
5. How to set up the map
Discover all the functionalities of this section with our go through guide.