
Need some help with Shopify Module set up? Here's the process step by step.
Shopify Module is a useful tool that will allow you to show carriers' rates and/or Drop Off Points at the Checkout after payment so that your customers will be able to choose the most suitable service for their shipment. Ship & Collect will display the Carriers connected on ShippyPro: based on the name and the service connected there will be displayed Carriers prices accordingly.
Summary:
Shopify has started the rolling out New Online Store 2.0, an enhanced checkout experience. As part of this update, the current version of our Plug&Ship for Shopify plugin may no longer be compatible with Ship&Collect.
But don’t worry—our team is already working on a new, improved version of the plugin to ensure seamless compatibility with Shopify’s latest features. We expect to have the updated version ready well before the full rollout is completed by the end of August.
You can discover more about new Online Stores 2.0 contacting Shopify or going to https://shopify.dev/docs/storefronts/themes/os20
1. Connect Shopify to ShippyPro
-
First, go to Marketplace and click on the Shopify logo.
-
Then click on Link my Shopify account to start the connection.
-
You'll be then redirected to the Shopify App Store. Here you should click on Add App to download and install ShippyPro in your profile.
-
At this point Log in to your Shopify store with your store's URL.
-
You'll be redirected again to your ShippyPro profile to complete the connection, this will take just a few seconds.
-
Enable Include drop off points at checkout and contact sales@shippypro.com for the activation:

To show live rates and/or Drop Off Points at Check-Out, your Shopify store needs to be on the Advanced Shopify or Plus plan. If you're on the Basic Shopify plan or lower, then you can add this feature for a monthly fee or switch from monthly to yearly billing. For more information, you can consult the following link or contact Shopify Support. Shopify map will be displayed by the customer only after the payment.
2. Connect your Carriers to ShippyPro
You need to connect your Carrier Accounts in order to show them at the Checkout.
-
You can do that by clicking on Carriers and selecting the Carrier to connect.
-
More info about how to connect Carriers in our dedicated Help Section.
-
Remember that to see rates they have to be added from Carriers > Edit Prices.
-
Visit the relative article to find out more about tariffs.
-
In case you don’t see the carrier rates at Shopify checkout, make sure that you correctly configured your carrier’s connection module, followed the connection procedure, and inserted the correct credentials (check for any extra spaces and delete them in case they’re present).
3. Personalize your map
From Ship & Collect > Maps Setup it's possible to add multiple settings in order to set up your maps according to your needs, such as the color of the buttons, dimensions, and the maximum distance shown from the address included.
But there's much more to discover, take a look yourself, and don't forget to check our dedicated guide: How to set up Drop Off Point Map
📌 Remember:
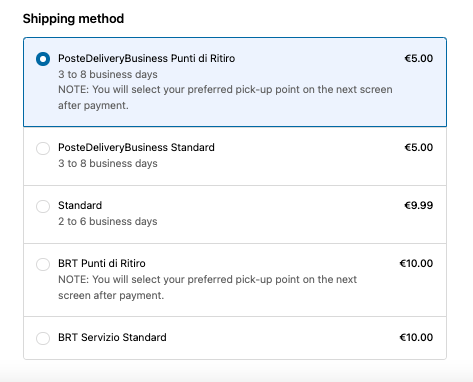
The map will be displayed after the payment, however during Shopify checkout the user will be guided to correctly select the pick-up point:
-
before the payment, when choosing the shipping service, a note in the rates will specify that the exact Pickup Point can be chosen after the payment, on the next page, example:
If the carrier rate isn't visible at Shopify checkout, verify also if the triangulation option is active in the Carriers > Edit prices section on ShippyPro and if not, activate it:
-
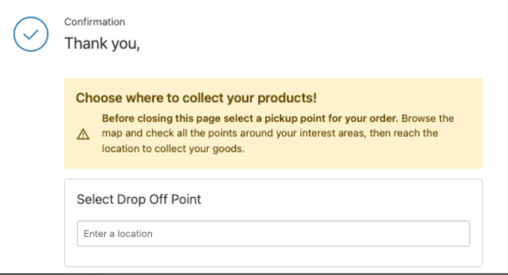
On the "Thank You" Page, after the payment, there will be an alert to draw the user's attention not to skip the step of selecting the specific Pick-up Point:
Custom settings for PUDO on Shopify
If you want to show carrier’s PUDOs at the checkout, but still keep your custom settings on Shopify (e.g. you want to include a flat rate shipping for specific order values, for instance 0€ shipping for all orders over 50€), you should add a Custom rate that includes one of these wordings in the carrier name and with the desired rate: 'Drop off points', 'locker', 'uffici postali', 'points de retrait', 'drop-off orte', 'punti di ritiro', 'servicio drop off'
The name of the carrier has to match exactly the name displayed on ShippyPro with no spaces.
This is an example of a correct rate name: UPSv2 - Drop off points

Is it possible to test Ship&Collect functionality in a copy of the Shopify theme (i.e. a draft), without interfering with the live site?
You will need a different store on another domain to test the feature or if you have a test store with its own url and settings, you can test with that one! Otherwise, you’d better try on a low-traffic timeframe to minimize impact.