How to connect Shopify to ShippyPro
Learn how to connect Shopify step by step
Let's connect Shopify to ShippyPro to start importing your orders from the number one ecommerce platform in the world.
You can connect multiple Shopify stores to a single ShippyPro account. However, to avoid potential conflicts, please note that the same Shopify store cannot be linked to more than one ShippyPro account.
Summary:
1. Connection step
-
Click on Marketplaces from your ShippyPro profile and click on the Shopify logo.
-
Click on Link my Shopify account to start the connection.
-
You'll be then redirected to the Shopify App Store. Here you should click on Add App to download and install ShippyPro in your profile.
-
Log in to your Shopify store.
-
You need to add your production live URL, any under-maintenance website URL won't be accepted.
-
You'll be redirected again to your ShippyPro profile to complete the connection in a few seconds.
-
Once connected Shopify to ShippyPro, all Plans Payments will be conveyed through Shopify.
❗️If you employ a third-party plugin (such as Orderify, etc.) order data might be imported incorrectly.
❗️Please note that order IDs containing emojis or special characters (such as -, /, *, !, %) are not supported, therefore the order details might not be correctly imported into ShippyPro.
❗️You need to insert the main domain when connecting your Shopify store.No aliases will be accepted.
Shopify B2B version is supported by ShippyPro
In case you receive an error "Oauth error invalid_request: The Redirect_uri Is Not Whitelisted" when trying to connect to your Shopify store, please contact our Support Team and we'll make sure to enable you.
2. Additional options
By clicking on Edit from the Marketplaces section you'll have some different options that will help you personalize Shopify use on ShippyPro:
Import paid orders
By enabling this option, orders for which payment has not yet been confirmed on Shopify will not be imported into ShippyPro. This ensures that only orders with confirmed payment are imported from Shopify.
Order shipped notification
Customers will be notified when the order will be shipped.
Location
By adding your warehouses in this section and selecting them from Marketplaces > Edit they will be updated each time an order is dispatched.
COD
-
In order to apply a COD Extra-charge to the Recipient you can set it directly inside the Marketplace connection menu (please note that decimals are not accepted in this field):

-
To show your Cash on Delivery orders updated as "paid" on Shopify, an Annual Professional plan is required. Contact our Support team to test this feature or upgrade directly on Admin > Plans page!
Flagging Update the Shopify marketplace with the shipping information and mark the order as shipped we will mark the order on Shopify as Shipped each time an order is transmitted.
Split Orders
On Shopify, you have the possibility to Split orders so as to assign the items of a single order to different expeditions and ship them at different times. 📦
.png)
When part of one of these orders is shipped, you'll see on Shopify a Partial Fulfillment status that gets totally completed once also the other part is shipped.
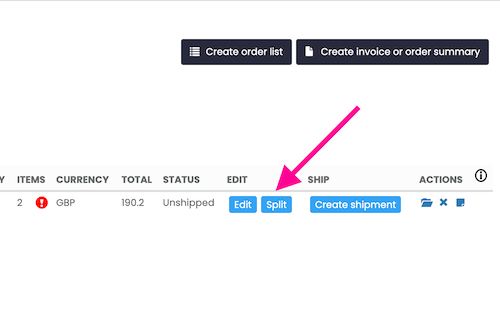
You can manage Split orders on ShippyPro from To Ship page by clicking on Split button on the right of the orders:

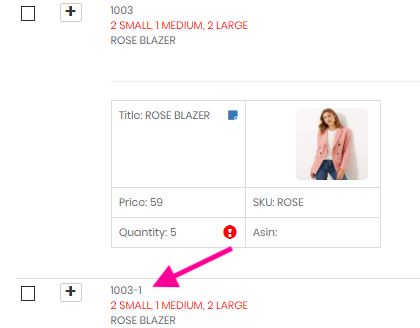
You will easily recognize Back Orders since they're marked as Order ID-1.

It is not possible to split orders with more items with the same SKU - I. e. from the same order with 10 items with the same SKU it is not possible to send them at different times.
HS Code
ShippyPro can automatically import the HS Code from Shopify with every annual plan subscription so that you don't have to include it every time. Then open a chat with us by clicking on the chat logo on the right bottom of the platform to ask for HS code automatic import from Shopify.
Currently the "Gift Card" payment method is not recognised, so if you have an order on Shopify partially paid with Gift Card and partially to be paid as COD, ShippyPro will still import the total value of the order. You can therefore change the correct amount manually when shipping your order.
Shopify Tags
With the New Experience, it is possible to view the Tags imported from Shopify! Filter and create Custom Views based on the tags you're accustomed to using.
Update Orders Behaviour
You can choose between 2 options:
Continuous update: Orders are updated continuously via webhook. This means that after an order is imported from Shopify into ShippyPro, any changes made to the order in Shopify (e.g. new tags, added products, changes to the address, etc.) will also update the order in ShippyPro.Note: The update does not occur if the order has already been marked as Shipped and then moved back to To Ship.
Only creation: Orders are only imported . Any edits made to the order in Shopify after it’s imported into ShippyPro will not impact the order in ShippyPro. This means that if an order is edited in Shopify after import, the order details in ShippyPro will remain unchanged.

3. Errors & Troubleshooting
Go to this link to check common errors and resolutions:
How to fix Shopify errors