With ShippyPro Drop Off Point Map your customers will have the possibility to choose the Drop Off point and the Carrier Service that most suit their needs, so that you'll offer them a better Shipping Experience and your shipping cost will be reduced.
Let's see how to set it up in just few steps!
Summary
1. Change the different colors of the Map
To personalize your map settings go to Checkout > Maps Setup.
Here is what you can do:
From the button to the text and the background color, it's up to you!
2. Change Map dimensions
So you can resize the Map according to your website or use it full screen.
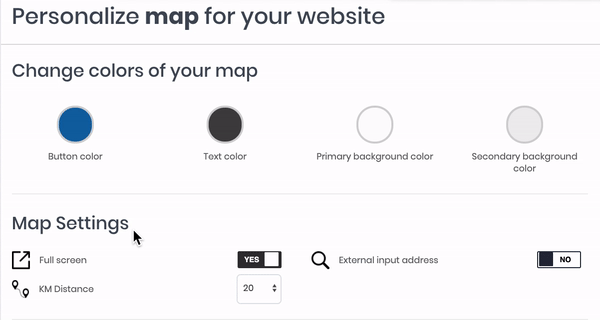
3. External Input Address
Select External Input Address if you'd like your customer to personally include a specific address to refers to.
4. KM Distance
Right below this option you can choose the distance to show.
-Apr-15-2024-09-00-58-1028-AM.gif)
Walk and Car distance will be displayed with a Paid Plan, otherwise you’ll see only the distance as the crow flies.

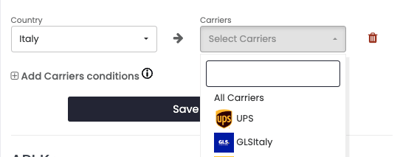
5. Set Carriers
You can apply one or all of your carriers that features Drop Off points.
In order to do that, just select the ones you're interested in and their relatives services.
-Apr-15-2024-09-00-59-8927-AM.gif)
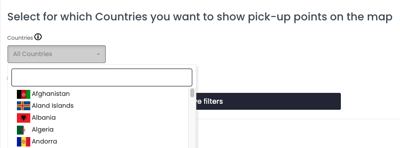
6. Configure filters for Country and Carriers
Configure the map search behavior according to your shipping needs.
You can define up to five countries in which to limit your search! Simply use the specific filter and select the countries from the drop-down menu. This way, visitors to your site will not see pick-up points from countries that you have not selected.
In addition, you can set your preferred carrier conditions by defining that only one or more specific carriers are displayed on the map for a specific country!
Click 'Add courier conditions' and select the country in which a specific carrier should be displayed, then from the drop-down menu, choose the carrier and you're done!
The API Key displayed at the end of the page it's necessary for the configuration of the Drop Off Point Map inside the Module on your website.
Then settings will be automatically saved and applied to your website, so that you're immediately ready to go.
If you'd like to know how to show the information picked from the Drop Off Point Map selection on your labels feel free to take a look to our dedicated guide to Advanced Settings.