MyDHL is a web service from DHL, one of the major logistics providers globally.
In this article, you will learn how to connect MyDHL to ShippyPro and add additional options such as a return label in the box or paperless trade to your existing connection.
Overview:
1. Before you start
Register on the DHL Developer Portal
To proceed with the connection, you need to have an API Key, an API Secret and an Account Number that you can retrieve by registering to the DHL Developer Portal if you don't have one yet.
Fill out the DHL onboarding form
-
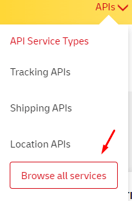
Go to APIs > Browse all services
-
Click on DHL Express - MyDHL API

-
Then on Get Access

-
Fill in your company data.
-
At "How would you like to use the API?" inside the DHL registration page, you should select the option "I require credentials to DHL Express – MyDHL API for an existing plugin/ecommerce platform/third-party solution" and simply add ShippyPro.
-
Concerning the section called "Requested Services", please tick over all the services available. The field named "Transaction volume per month" is only useful to DHL for statistics purposes, therefore it won't influence you on the use of the API.
-
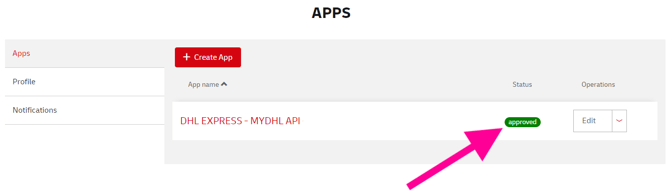
After some hours you can check your DHL Developer profile where you should be able to see your App Status as approved.
-
Then, click on DHL EXPRESS – MYDHL API under App Name where you will Request Production Access on a red button. Once you click it, you will receive confirmation that the request has been sent within minutes and the local DHL team will need to approve it according to their timeline.
In case the request remains pending please contact DHL directly in order to speed it up.
-Apr-15-2024-09-04-40-6324-AM.png?width=670&height=329&name=image%2B(1)-Apr-15-2024-09-04-40-6324-AM.png)
Please also refer to DHL guide step-by-step guide here in case of questions or doubts
2. Carrier's Configuration
Now that everything is correctly set up in MyDHL portal, you're ready to connect it to ShippyPro.
Navigate to Carriers and click on MyDHL Logo (simply type "MyDHL" on the search bar to spot it in a sec).
Once identified, click to connect the courier and fill in the required fields:
- Api key
- Api secret
- Account number
- Return account number (optional)
- Label type
- Enable Return Label in the box: to create the return label simultaneously with the outbound label
- Product type: Select your desired service or choose "ALL SERVICES" to view all available rates. For assistance in identifying active product codes, consult your DHL Account Manager. If you wish to include multiple services, you will need to establish a separate connection for each one.
Please note that the EXPRESS WORLDWIDE NONDOC service is exclusively for goods, while the EXPRESS WORLDWIDE DOC service is specifically designed for documents and cannot be used for other types of physical items.
- Select the default amount of additional weekdays required to prepare the shipments
- Paperless trade: To digitally transmit the commercial invoice
- Generate Invoice with DHL format:
- Add freight charges to commercial invoice: If you select this option, the shipment costs will be added to the commercial invoice
- Delivery Signature Option: With this option MyDHL will require a signature to the recipient as a delivery proof.
Contact your MyDHL Account Manager to know if you are allowed to use this option and related fares. - GoGreen Plus: Select this option only if your contract includes it
- Generate Waybill Document with DHL format (Archive Doc Label)
- Extend label validity duration (Data Staging): This service is usually used for return labels, and it will add the extension RET on the label created by MyDHL.
By selecting the Extend label validity option, you can extend the duration of a label without knowing the actual date of handling to the Carrier.
- Test mode: disponibile solo con le credenziali di test
- By checking this box, I acknowledge that I have read the message below: Se effettui spedizioni in contrassegno, ricordati di contrassegnare la casella.
Be sure that you avoid inserting spaces when you copy and paste, otherwise you will see the error "Invalid Credentials"
Please note that you should not enter the email address you use to access the MyDHL portal in these fields.
3. Additional Features
Destinations
- National: Available
- International: Available
Features:
-
Label PDF: Available
-
Label PDF (dimensions): A4 & A6
-
Label ZPL: Available
-
Label EPL: Not Available
-
Track & Trace: Available
-
Paperless: Available
-
PickUp/DropOff (PUDO): Available
-
Cash On Delivery: Available
-
Live Rates: Available
-
Return Labels: Available
-
Return Labels (in the box): Available
-
Book/Schedule Pickup: Available
-
Address Check: Not Available
-
Carrier Options: Available
-
Proof Of Delivery (POD): Available
-
Insurance: Available
-
Multiparcel: Available
-
Delete Shipment (Void): Not Available
-
CloseOut: Not Available
-
CN22: Not Available
-
CN23: Not Available
-
Credentials Validation: Not Available
-
IOSS: Available
-
Dynamic sender: Available
-
After Ship ETD: Available
Services
|
Service Name
|
Service Code
|
|
All Services
|
ALL
|
|
ECONOMY SELECT NONDOC (ESI)
|
H
|
|
EXPRESS 9:00 DOC (TDK)
|
K
|
|
EXPRESS 9:00 NONDOC (TDE)
|
E
|
|
EXPRESS 10:30 DOC (TDL)
|
L
|
|
EXPRESS 10:30 NONDOC (TDM)
|
M
|
|
EXPRESS 12:00 DOC (TDT)
|
T
|
|
EXPRESS 12:00 NONDOC (TDY)
|
Y
|
|
EXPRESS DOMESTIC (DOM)
|
N
|
|
EXPRESS DOMESTIC 9:00 (DOK)
|
I
|
|
EXPRESS DOMESTIC 10:30 (DOL)
|
O
|
|
EXPRESS DOMESTIC 12:00 (DOT)
|
1
|
|
ECONOMY SELECT DOMESTIC (DES)
|
G
|
|
EXPRESS WORLDWIDE DOC (DOX)
|
D
|
|
EXPRESS WORLDWIDE NONDOC (WPX)
|
P
|
|
EXPRESS WORLDWIDE EU (ECX)
|
U
|
|
FREIGHT WORLDWIDE (FRT)
|
F
|
|
ECONOMY SELECT EU (ESU)
|
W
|
|
EXPRESS ENVELOPE DOC (XPD)
|
X
|
|
MEDICAL EXPRESS DOC (CMX)
|
C
|
|
MEDICAL EXPRESS NONDOC (WMX)
|
Q
|
|
EXPRESS JUMBO (WPX)
|
J
|
|
SAME DAY (SDX)
|
S
|
Carrier options
| Name | Slug | Type | Description |
|---|---|---|---|
| Saturday Delivery | saturday_delivery | checkbox | |
| Duties and Taxes Paid | duties_taxes_paid | checkbox | |
| Importer Of Record | importer_of_record | checkbox | |
| Dangerous Goods | dangerous_goods_contentid | select | Allows to specify the type of dangerous goods shipped. Supported values are listed in the table below. |
| Dangerous Goods 4-digit UN Code (Mandatory for Excepted Quantities) | dangerous_goods_uncode | text | To use with Dangerous Goods when the selection is "Excepted Quantities in accordance with IATA". |
| Dangerous Goods Weight in Kg (Mandatory for Dry Ice UN1845) | dangerous_goods_dry_ice_weight | text | To use with Dangerous Goods when the selection is "Dry Ice UN1845". |
| Dangerous Goods Custom Description (Max 200 chars) | dangerous_goods_custom_description | text | To use with Dangerous Goods. This description (max 200 chars) will replace the default label text of the selected Dangerous Goods. |
| Extended Liability | extended_liability | checkbox | |
| Shipment Insurance | shipment_insurance | checkbox | To use with Insurance Amount. |
| Neutral Delivery | neutral_delivery | checkbox | |
| Delivery Signature | delivery_signature | checkbox | |
| Go Green | go_green | checkbox | Adds FE service code and the logo. |
| EXW Only Duties and Taxes | exw_only_duties_taxes | checkbox | To use with Incoterm EXW. |
| Service Point ID | service_point_id | drop_off_point | |
| Receiver Registration Number Type | receiver_registration_number_type | select | To use with receiver_registration_number_value. Supported values: VAT, EIN, CNP, EOR, FED, SDT. |
| Receiver Registration Number Value | receiver_registration_number_value | text | To use with receiver_registration_number_type. |
| Signature Options | signature_options | select | Signature. Deprecates delivery_signature option. |
| Declaration Notes | declaration_notes | text |
Commercial Invoice declaration. |
| Verified Delivery | mydhlverified_delivery | checkbox |
|
|
Add Piece |
mydhladdpiece | text |
Add parcels to a master shipment |
|
Non Stackale pallet |
mydhlnon_stackable_pallet | checkbox |
|
Label design
-
PDF 10 x 20 - available for barcode and text
-
ZPL - available for barcode and text (Note: not available for ZPL 10x15)
For more info click here.
Service Point
If you wish to use myDHL's Service Point, you will need to contact your contact person to verify ODD service enablement (required to use this feature).Once ODD service is enabled, you will need to send the courier's technical department a screenshot of the Carrier Option where the Service Point is chosen, and request service enablement on the desired username.
The Service Point will never appear on the label, which is instead transmitted electronically to the carrier in charge of delivery.
Dangerous Goods
For each shipment containing Dangerous Goods you must insert the contentId of the shipped dangerous goods.
If the shipment contains Dry Ice UN1845 you must insert the weight of the transported dry ice.
If the goods are in Excepted quantities in accordance with IATA, you must insert also the UNCode of the dangerous goods, available here.
Dangerous goods supported by the MyDHL integration:
|
Name
|
Content id
|
Special service code
|
|
Biological substances UN3373
|
650
|
HY
|
|
Class 2 Division 2.1 Flammable gas
|
910
|
HE
|
|
Class 2 Division 2.2 Non-flammable, non toxic gas
|
910
|
HE
|
|
Class 2 Division 2.2 Non-flammable, non toxic gas
|
910
|
HE
|
|
Class 3 Flammable Liquids
|
910
|
HE
|
|
Class 4 Division 4.1 Flammable solids
|
910
|
HE
|
|
Class 4 Division 4.2 Substances liable to spontaneous combustion
|
910
|
HE
|
|
Class 4 Division 4.3 Substances (Dangerous when wet)
|
910
|
HE
|
|
Class 5 Division 5.1 Oxidizer
|
910
|
HE
|
|
Class 5 Division 5.2 Organic Peroxides
|
910
|
HE
|
|
Class 6 Division 6.1 Toxic Substances
|
910
|
HE
|
|
Class 8 Corrosives
|
910
|
HE
|
|
Class 9 Miscellaneous Dangerous Goods
|
910
|
HE
|
|
Consumer Goods ID8000
|
700
|
HK
|
|
Dry Ice UN1845
|
901
|
HC
|
|
Excepted quantities in accordance with IATA
|
E01
|
HH
|
|
Ion PI965 Section IA (LiBa)
|
911
|
HE
|
|
Ion PI965 Section IB (LiBa)
|
911
|
HE
|
|
Ion PI965 Section II (LiBa)
|
965
|
HB
|
|
Ion PI966 Section I (LiBa with equipment)
|
910
|
HE
|
|
Ion PI966 Section II (LiBa with equipment)
|
966
|
HD
|
|
Ion PI967 Section I (LiBa in equipment)
|
910
|
HE
|
|
Ion PI967 Section II (LiBa in equipment)
|
967
|
HV
|
|
Limited quantities to the limits of ADR
|
A01
|
HL
|
|
Metal PI968 Section IA (LiBa)
|
911
|
HE
|
|
Metal PI968 Section IB (LiBa)
|
911
|
HE
|
|
Metal PI969 Section I (LiBa with equipment)
|
910
|
HE
|
|
Metal PI969 Section II (LiBa with equipment)
|
969
|
HM
|
|
Metal PI970 Section I (LiBa in equipment)
|
910
|
HE
|
|
Metal PI970 Section II (LiBa in equipment)
|
970
|
HW
|
|
Perishable Cargo
|
P01
|
HG
|
Print Return Labels
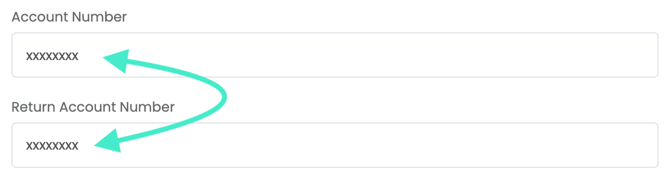
If you’d like to print shipping and return labels together while you ship your orders (return label in the box), add your Account Number inside the "Account Number" field and your Return Account Number in the "Return Account Number" field. Then tick Enable Return Label in the box option at the bottom and confirm. Please note that the label format will be the one you chose for outbound shipments since it cannot be changed for return labels.
If you’d like to make Returns separately from the main shipment, you need to create a new MyDHL connection. This time, insert your Return Account Number in the "Account Number" field and your Account Number in the "Return Account Number" field. So basically, the exact opposite of the first set-up. Do NOT tick the Enable Return Label in the box option. Finally you can create your manual shipment for the Return: click here to learn how.
By selecting Fixed Return Receiver Address (Only for 'Enable Return Label in the box'), if Enable Return Label in the box option is checked and an address is selected from the dropdown menu, the labels in the box are redirected not to the sender address, but to the address set in the dropdown.
You can add and edit the available address at any moment from Admin > My Addresses and parcels > My addresses
Default amount of additional weekdays required to prepare the shipments
This information is used by DHL to find out the planned date of shipment, but it is not equivalent to a pickup request (here how to do). The default amount of days required is 1 day, you can change it as you please by selecting the number of required days. The system will automatically skip bank holidays and weekends in the required days count.
📌 Make sure to do this on all your MyDHL connections, even though you might use only one service.
📌 If you choose "same day" ask DHL until what time you can create shipments, otherwise you may get an error.
International shipments
Generate invoice with DHL format
This option will allow you to automatically generate your invoices for international shipments. You can choose among proforma and commercial invoice.
By selecting this option the invoice will be generated together with the shipping label!
Paperless Trade
You can decide to enable the Paperless documentation option by ticking "Paperless Trade" in Carriers > MyDHL > Edit. In this case, you will need to digitally transmit to the carrier an invoice by uploading your ETD invoice inside the order before shipping it, via UploadPaperlessDocumentation API call or requesting to DHL the generation of an invoice with their format (in this case, please read the next points).
It is also possible to upload the Customs declaration type inside the order and decide to enable the option Generate Invoice with DHL format from Carriers > MyDHL > Edit.
It is important to that to note that you'll need to select the correct typology when uploading your documentation, for example, "Customs Declaration".
If you select both Generate Invoice with DHL format and Paperless options from Carriers > MyDHL > Edit, as well as upload the Customs Declaration inside the order, both the commercial invoice and customs declaration will be electronically transmitted to the carrier.
Some practical examples:
-
the option "Paperless Trade" is enabled, but neither the ETD is uploaded for a specific order, nor the option "Generate Invoice with DHL format" is enabled: we will return an error because you're requesting to send a paperless invoice, but no invoices are associated with that order
-
both "Generate Invoice with DHL format" and Paperless options are enabled: in this way, you are requesting DHL to generate an invoice and to send it digitally without having to physically attach the invoice to the package (Paperless Trade)
-
both ETD document is uploaded, and the option "Generate Invoice with DHL format" is enabled: we will return an error because you are asking to transmit 2 different invoices for a single order
-
You didn't flag the "Paperless Trade" option, but still proceeded with uploading the document via the "UploadPaperlessDocumentation" call or inside the order - the documentation will still be transmitted to the carrier in Paperless mode.
In case you need to ship documents (hence to ship non-dutiable cargo), you will have to do so from a connection with the “Paperless Trade” option disabled and enter “documents” in the content description field: this way the shipment will be set to non-dutiable.
Windsor Framework
For more information, click here
Add Piece for multiparcel shipments
MyDHL Add Piece service aggregates parcels based on the AWB (shipment number) generated in the initial shipment, enabling customers to manage multi-parcel shipments more flexibly.
This service requires a DHL account-specific enablement per username. Contact your DHL representative for this request.
Here you will find the steps for the Add Piece procedure in order to add multiple parcels to a single shipment created previously and not yet handed over to the carrier:
1. Master Shipment (First Parcel)
Set the mydhladdpiececarrier option with isMaster: true to create the initial shipment that remains in "open" state without specifying total parcel count. The API returns an AWB that must be saved and tracked.
{ "CarrierOptions": [ { "name": "mydhladdpiece", "value": "{\"isMaster\":true}" } ] }
2. Subsequent Parcels (Intermediate Packages)
Always specify the main shipment's AWB in the carrier option when adding parcels. Each added parcel receives a unique PackageTrackingNumber (PTN), while the AWB remains the same for all parcels in the shipment.
{ "CarrierOptions": [ { "name": "mydhladdpiece", "value": "{\"awb\":\"<masterAwb>\",\"date\":\"2026-05-26\"}" } } ] } 3. Shipment Closure (Last Parcel)
Set isLast: true to close the shipment automatically. The total parcel count is printed on the last parcel's label.
{ "CarrierOptions": [ { "name": "mydhladdpiece","value": "{\"awb\":\"<masterAwb>\",\"date\":\"2026-05-26\", \"isLast\":true}" } } ] }
4. Errors & troubleshooting
While trying to connect MyDHL or while shipping your orders, you might experience some errors. No panic! For more information on how to solve them, please consult our following guides: