ShippyPro automatically compares the shipping rates of your Carriers and chooses the best option for you. Follow this article to easily set all of the rates and manage the Carrier options seamlessly. Learn how to save time and money setting your carrier rates!
Summary:
1. Before you start
What are carrier rates and how can you set them? Before you start inserting your Carrier's prices you have to connect the Carrier you have a contract with. Check from the list whether you need to insert your prices as some Carriers (MyDHL, UPS, FedEx, TNT Express, Aramex and Chronopost) automatically send your negotiated rates to ShippyPro during shipment creation. For these Carriers, you don't need to add any rates, since they're automatically retrieved from your account and contract.
In order to add your carrier rates, you need to connect your Carriers first.
Note: ShippyPro does not resell shipping rates. To use the platform, you must have at least one active contract with a carrier.
2. Add your zones
-
Go to Carriers section and then click on Edit Prices to edit the tariffs of one of your connections.
-
Click on Add Zones.
Add your zone manually
-
Type an easy-to-recognize name to your zone.
-
Type the states you want to include manually and select them from the list.
-
If you want to insert more specific areas you can insert the postcodes after you have selected the state.
-
You may also need to exclude some zones, for example, difficult areas. In this case, click on Excluded Zone on the top left and add the relative postcodes.
-
Remember that If you'd like to exclude some zones, it's important to insert them only after the included zones. For example, add the zone France first if you need to exclude some difficult zones of France.
-
You can also decide to custom your Zone with Postcodes, in order to do that Click here if you want to custom this zone with postcodes: you can either add the entire ZIP code or just how it starts.
Remember that the same postcode cannot be entered in different zones. Should there be a duplicated postcode in several zones, the system will conflict and rates linked to the postcode in question will not be displayed correctly.
Bulk add your postcodes
-
If you have a list of postcodes ready to go, click on Bulk add postcodes, this will allow you to import all the postcodes that interest you.
-
If you don't have a specific list of postcodes you can add the first numbers/letters and tick the Starts with option, this will allow you to include all the postcodes included in that area.
-
Once you have inserted them in column click on Confirm and save your zone by clicking on Add Zone.
-Apr-15-2024-09-06-03-5819-AM.gif)
If you have already configured areas in a country with a list of postal codes, you will not be able to add a new area of the same country without including those codes. This limitation applies to all carriers.
However, if you wish to create an area that includes that country and another one, you will be able to save the configuration without necessarily having the list of the zip codes.
If you have added the same postcode or part of it to multiple zones, our system will check all the zones configured for that specific connection and display the rate from the last zone found/added.
3. Exclude Zones / Postal Codes
In certain occasions it may be necessary, for example for difficult areas, not to include some areas or Post Codes for carriers shipments.
With ShippyPro you can decide to exclude them for specific carriers in just few steps:
-
Add one or more Zones
If you'd like to exclude some areas from a specific zone, it's important to add these ones only after having included the zones concerned. For example, add the zone Italy first if you need to exclude some zones of Italy.
You can do that from Carriers > Edit Prices.
-
Add Zip Codes
In order to exclude some zones, add another zone that will be the one excluded, and then click on Edit. ✏️
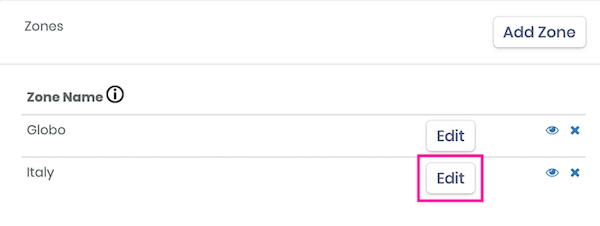
And on Excluded Zone on the top left.
Then flag Click here if you want to custom this zone with postcodes so that you'll be able to include only specific postcodes in case you're not interested in excluding the entire nation selected.

To cover an entire area with the different Postal codes that begin with the same numbers, flag Starts with before including them.
This option is not available for every carrier, carriers with automatic import of tariffs are not included.
To add your postcodes in bulk, click on Bulk add postcodes. Then, add all of them in column and click on Confirm:
Remember to always click on Add Zone on the bottom to successfully save your settings.
4. Set your carrier rates
For each zone, you can then add your weight ranges with the relative prices. You can either import them with Excel or add them manually. To import them with an Excel file, you need to enter only the weight ranges first.
The weight ranges cannot be different for each zone but must be standardized for the entire connection.
Weight ranges refer to the total shipment weight, the single parcel weight can be set in the additional options below “Single parcel maximum weight”.
-
Click then on Download Excel to download the predefined file. You can match weight ranges included before with the relative prices. It will only take you a minute.
-
Adding weight ranges manually it's simple as well. Add the weight range and then add the relative price for each zone.
-
Remember that the unit of measure of weight makes reference to the one you set when you first registered to ShippyPro. You can change it from My Profile > Preferences.
-
If you need to connect the same Carrier twice you can automatically copy the same price list from another connection.
Note that you don't have to add rates for Carriers that don't support live rates if you're not interested in tariffs comparison or if you only have one Carrier. However, you will need to put at least a fictitious weight range and price in order to be able to proceed with shipment creation, such as for example:
0-100kg = 0€
5. Set extra option surcharges
When setting surcharges you may want to distinguish from Carrier Options and other more generic options which tend to be present in all carriers.
Carrier Options
-
Define the surcharges for the extra options the Carrier offers.
-
Depending on which Carrier is connected you might want to add surcharges (if present in your contract) for Floor Delivery, Drop off locker Delivery, ...
-
Remember that these options are different for each Carrier so, if you have multiple contracts with different services, you will have to insert them each time.
General Options
Here you can set if your carrier supports Cash on Delivery, Multiple Parcels or Triangulations by clicking on the relative buttons. Also, you'll then find some additional options and surcharges that you need to enter only if you have them listed on your Carrier contract.
Here some examples:
-
Fuel surcharge %:
It's fuel percentage charge to add to your tariff.
-
Cash on delivery surcharge and Cash on delivery surcharge %:
These options add a surcharge amount to the tariff if shipment contains COD payment. The first one indicates a fixed value, while the second one is assigned accordingly to the percentage included.-
Eg. if COD is 100 euros and percentage is 10%, 10 euros will be added to the final tariff.
-
Note: If both percentage and fixed value are declared, the system will only consider the higher one.
-
-
Single parcel maximum weight:
In the case of a parcel that exceeds the value added in this field, the Carrier will be automatically excluded. -
Maximum side sum:
If L + H + W exceeds the included value, the Carrier will be automatically excluded.-
Note: if your Carrier supports greater parcel shipment, you can follow the same logic as for parcel maximum weight.
-
-
Maximum major side - minor side sum:
This option excludes the Carrier if major side - minor side sum exceeds the value included.-
Eg. Major side - minor side sum = 50. If parcel dimensions are 100 x 50 x 10, keeping into consideration that major side is 100 and minor side is 10, 100 + 10 = 110 > 50
Carriers will automatically be excluded.
-
-
Delivery days - min and max:
They need to be applied only in case you use Live Rate, then they'll be automatically calculated and shown during Carriers comparison. -
Additional parcels surcharge:
This also follows Maximum Side Sum rules, so add here the price for each extra parcel. -
Fixed surcharge:
As the name can suggest, putting a fixed value here, it will be applied to every shipment made with that Carrier. -
Triangle surcharge:
Even in this case you can apply a fixed price for triangle shipments (so if sender address for a shipment is different from the one in your Profile). -
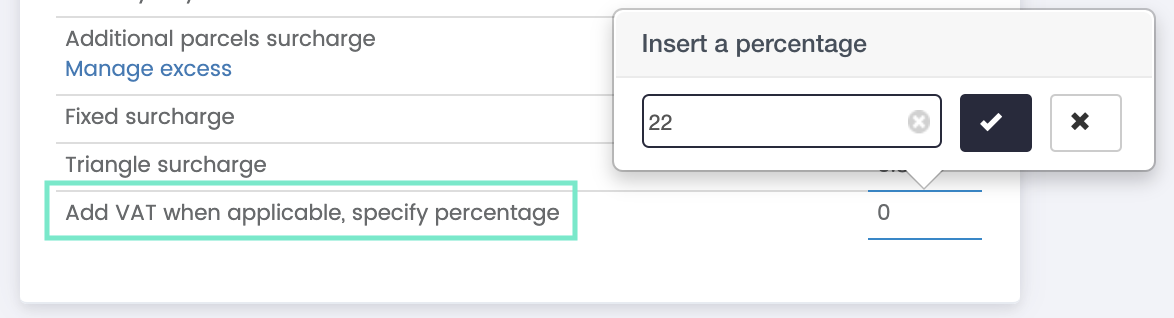
Add VAT when applicable, specify percentage:
You can add here VAT in order to show prices with it included. - Denominator Coefficient is usually an internal 4-digit number (e.g. 3000 or 6000) provided to you by the carrier. By multiplying the height, width and length of the parcel and dividing them by the denominator coefficient gives a number.
Here's an example: 20x20x20 = 8000 / 3333 = 2.4kg (volumetric weight).
Add VAT for Carriers with Live Rating
This applies to DHL Express, UPS, FedEx and TNT Express but not only, you can find the whole list of Carriers here by clicking on Live Rating feature.
It's possibile to add VAT from My Profile > Preferences, inside the box Carriers Preferences > Uncheck 'Show tariffs with no VAT' if you'd like to include VAT and click on Save Changes.
-1.png)
Note: 'Show tariffs with no VAT' is selected by default. This means that ShippyPro won't include VAT in your carriers' rates unless you uncheck this option.
Add VAT for Carriers without Live Rating
You can include VAT % for Carriers that doesn't have Live Rating directly from Carriers' Price List.
-
Just go on Carriers
-
Find your Carrier and click on Edit Prices. Here we have GLS as an example:

-
On the right side of the page, the last row is 'Add VAT when applicable, specify percentage', click on the zero and enter your VAT % and click on the tick to save ✔️.
6. Handle Overweight
From this section, you can manage overweight. After setting up all your weight ranges, you should enter the maximum weight that you find on your Carrier contract. You'll then have a gradual price increase every X kg starting from the maximum weight you added. This value should be included in your Carrier contract. Here's an example: the maximum weight is 500 kg and the last weight range you set is 20 kg. Starting from 20 kg to 500 kg, you'll pay 1 euro every 10 kg.
You can enter a price increment for each zone.
-3.gif)
Can I retrieve rates for all my Carriers?
If you're wondering if you have the possibility to retrieve rates for all your Carriers the answer is: yes, of course! 🙌
Anyway, in case you'd like to receive them for a predefined list of Carriers you'll only need to include the ones you're interested in when making the GetRates API call.
e.g. Italian Carriers for Shipments to Italy, International Carriers for abroad shipments etc.
Once the best Carrier solution is chosen according to your needs, you can proceed by making our Shipping API call in order to create your shipping labels and be ready to ship!
7. Troubleshooting & Errors
Go to this link to check common errors and resolutions about rates:
My Carrier rates are wrong