
Here's how to customize you tracking mails step by step
ShippyPro allows you to set email conditions and customize tracking emails that are automatically sent to your customers as soon as a new shipment status is received. Send effective emails aligning the content with your brand and boost your customer retention instantly.
Summary:
1. Before you start
First define the tracking update emails you want to send to your customers and select them from the Email Conditions page.
Regarding the Use ShippyPro Tracking Page flag, if the switch is activated, users will be redirected to the ShippyPro Tracking Page when they click the "Track Your Shipment" button in the email; otherwise, they will be directed to the carrier's tracking page.
Then edit the content of the emails for each language, marketplace and carrier:

2. General settings
Once you have set your email conditions you can start customizing your emails.
Learn to use the filters so that all your tracking assets are aligned with your brand.
-
Select the language associated to the template you would like to customize
-
ShippyPro provides already translated email Templates in 8 languages that will be sent according to the country of destination: German, English, Spanish, French, Italian, Polish, Portuguese and Dutch.
-
If you remove the tick from Marketplace and Carrier, the Template will be customized for every Marketplace and Carrier connected.
-
If you connect new Carriers or Marketplaces, you will need to tick and untick them again, so as to standardize the templates for the new connections as well.
-
You can set your own logo to customize tracking emails.
The logo should be:
- in JPG or PNG format
- with a max dimension of 250 x 250 px
- in rectangular, NOT square format.
3. Customize your templates
In the top tabs, you can find all templates divided by status.
![]() Click on the emails you want to work on and start customising them.
Click on the emails you want to work on and start customising them.
Any changes made to the editor will immediately be displayed in the preview on the left-hand side and saved.
Now let's see how to edit the template:
Content
This section allows you to modify all the textual content of the email:
-
Show Logo: Choose if you want to show your company logo or use a placeholder that will be replaced automatically with the respective values for each order.
-
Customize Subject of the email: use a clear and concise sentence to make sure your customer instantly knows what they are about to open.
-
Customize Name: Insert the name of your Company
-
Customize the Title of the email: Choose a clear title.
-
Customize Message: add all the information you want your customer to know at this point. Make it even more personal by adding one of the placeholders:
- |CLIENTNAME| - Name and Surname of the customer
- |MARKETPLACE| - Name of the Marketplace
- |ORDERNUMBER| - Order number
- |STATUS| - Status of the shipment
Please remember that the |PLACEHOLDER| will be replaced only in Customize Message Section.
Good to know:
- The placeholder |STATUS| will replace only the internal statuses mapped in ShippyPro (e.g. Information received, In Transit, Exception), and not the ones present on the carrier's site.
- Your customers will be automatically directed to the courier's tracking page when they click the Track Shipment button, contained within the email.
- The URL corresponding to the shipment is automatically entered by ShippyPro and there is no need to enter the tracking code, upon clicking your customers will see the shipment details that the courier provided.
- Special characters are not allowed in the text fields.
Design
Once you have landed on this page, you can choose to include the order number inside the email design by ticking the relative option.
Order Summary
In this section, it is possible to customize Order Summary settings, Shipping Details, and Shipping Address.
You can even decide to include the following elements:
-
The Items Pictures or Prices in order to give a clear understanding of the order.
-
Choose to insert the Order Total or Shipping Price to show all those costs that are not related to the item itself.
-
Items Price and Shipping Price are not summed in the Order Total. The Order Total corresponds to the Items Price at the end of the email and the Shipping Price corresponds only to the cost of the shipment.
-
Choose to add further information like the Tracking Number, Sent Date, Shipping Address From and Shipping Address To.
Recommended Products
Use your tracking emails as a marketing tool and add the products you want to promote directly inside the template.
This feature is perfect if you want to boost sales of a particular product, or you have products on sale that you want to promote.
How it works:
1. Add a product
You can add a product using the select button under "Add a recommended product" and choose from products sold in the last 30 days.
2. Set the price
The price is automatically filled in as soon as you select the product, but you can still change it.
3. Enter the discount (if you want)
You can add a percentage discount for each product.
4. Product URL.
You must enter the product url to redirect your customers to your store.
5. Done!
Once you add the recommended products, you don't have to worry about it anymore, they will be sent by ShippyPro inside every tracking email!
We retrieve data from the last orders shipped. Since the details of the items to be selected are required, this functionality can only be used for orders from a Marketplace (no Manual Shipments or imported via Excel) or for orders shipped via API if they contain product details (e.g. via PutOrder API).
Banner
Here you can create and include a customized banner in three easy steps.
Simply add the banner link, the text, and the image address.
Dropbox or GDrive links are not supported, please add one from your production website).
Tracking emails boast an impressive 90% open rate which is why it is important to use all the available marketing tools to your advantage: banners can help you with upselling and customer retention by proposing all the products the customer has been waiting for.
Footer
You can also link your Social Networks inside the footer.
Try and connect your Facebook, Twitter, LinkedIn, Instagram, Google Plus, or even Pinterest account.
Boost your social engagement by linking all your accounts, and keep the conversation with your customer open by exploiting this extremely efficient marketing tool.
Feedback
Think about it, how many of our decisions are based on peer reviews?
You can use those to your favor by linking all of your external pages to this final step to take advantage of a happy customer's desire to share the excitement with the world.
If you're currently editing an email template for Leave Feedback, you can also redirect your clients to a Custom Feedback Page, like Trustpilot, for example.
-
Click on the Feedback editing section and enable the Use Custom Feedback page and insert the URL below.
-
Your customers will then be able to display feedback directly from your website review section.
-
If you don't have one, your customers will automatically be redirected to the ShippyPro Feedback page.
Start collecting positive feedback and increase your brand awareness by exploiting this tool to your favor.
Please note that if you decide to send a Test Mail, it will have the standard ShippyPro Feedback URL and it is not aligned to the real email your customers will receive.
4. Preview your templates
![]()
When you're done editing your email template, you can send a test email to yourself in order to view how your customers will receive your tracking updates.
You just need to click on Send Test Email and enter your email.
Note that for your test emails the subject will be displayed as ShippyPro tracking email test.
The actual tracking emails will have the correct title.
ShippyPro allows you to easily view your emails also from Mobile and Desktop.
So you make sure that they'll be optimized both for Desktop and Mobile Devices.
5. How languages work
ShippyPro assigns languages to the e-mails according to the country of destination of the shipment. The latter is based on the ISO 3166-1 alpha-2 Code.
You'll find the language associated with each code as follows:
-
Italian: "IT", "VA", "SM";
-
French: "FR", "DZ", "BE", "GF", "LU", "MA", "MQ", "PF", "RE", "PM", "VC", "TN", "CD", "MG", "CM", "CI", "NE", "BF", "ML", "SN", "TD", "GN", "RW", "BI", "BJ", "HT", "CH", "TG", "CF", "CG", "GA", "DJ", "KM", "SC", "MC", "NC", "JE", "MF", "WF", "BL", "GP";
-
Portuguese: "BR", "CV", "GW", "MO", "PT";
-
Spanish: "ES", "MX", "CO", "AR", "PE", "VE", "CL", "EC", "GT", "CU", "BO", "DO", "HN", "PY", "SV", "NI", "CR", "PR", "PA", "UY", "GQ", "IC";
-
German: "AT", "DE", "CH"
-
Polish: "PL"
-
Dutch: "NL"
6. Troubleshooting & Errors
I have personalized my templates for different Carriers or Marketplaces, but my customers received the standard template, how is that possible?
Make sure to check that you've modified each template, for each Marketplace and each carrier connection. To help distinguish the different carrier connections, you can label them with an easy-to-recognize name via Carriers > Edit
Are Tracking Emails sent automatically?
Yes, ShippyPro automatically sends Tracking Emails to your customers updating them upon each change of delivery status.
You can also decide which updates are sent to your customers!
How can I send email notifications with my email address instead of no-reply@shippypro.com?
You can connect your customized SMTP Server by filling out the required data from Utilities > Plugin > clicking on SMTP Server logo. If you don't have them, you can easily ask them to your SMTP Provider.
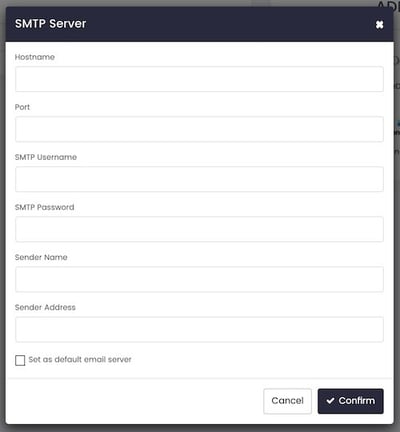
Tick the box at the bottom of the window to set your server as default.
If you'll receive a test email then the connection will be correctly established.
Note: POP3/IMAP and SMTP Server address follow this convention:
mail.domain.extension.
We currently do not support OAuth connections.
Can I remove ShippyPro logo from my Tracking Notifications?
Yes, of course! It's possibile to remove ShippyPro logo from Tracking Emails Template only if you have a customized Annual Plan. Here is our pricing and our plans.
If you would like to learn more about how a customized annual plan works, please contact our sales Team at sales@shippypro.com.
Please note that the disclaimer is not part of the logo and it cannot be removed.