How to connect Fan Courier
Discover here how to connect FAN Courier in just a few steps.
Let's see how you can connect FAN Courier to ShippyPro in just a few steps.
Summary:
1. Before you start
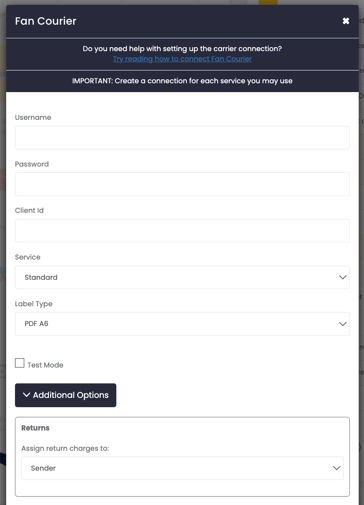
To connect the carrier, you need to first ask your FAN Courier Sales Person for credentials such as Username, Password, and Client ID.
2. Connection steps

-
You can insert the credentials on the Carriers page by clicking on the FAN Courier logo.
-
Choose one service in the dropdown menu:
-
Standard: Regular delivery service within the country.
-
Out Of Home Delivery: Delivery service to designated pick-up locations.
-
-
Choose the correct Label Type for your printer:
-
PDF A4
-
PDF A6
-
3. Supported services
Standard: Regular delivery service within the country.
Out Of Home Delivery: Delivery service to designated pick-up locations.
4. Additional options
Besides your credentials, you'll also see some further options, let's take a look at them!
-
Assign return charges to allows to specify one of the following subjects to cover the cost of the return shipment:
-
Sender
-
Recipient
-
Third Party, in this case you can enter the name of the Third Party to whom the payment should be assigned

-
-
Test Mode lets you make some test shipments.
The "Test Mode" option should be flagged only if you have test credentials, not production ones!
-
If you want, you can also enter a Custom Label to recognize the connection among all the others.
5. Troubleshooting & Errors
❓What does the error "Internal Server Error" mean?
Check if your FAN Courier connection is in Test Mode.
❓Do you support Cont Colector service?
We support Cont Colector for COD shipments