Let's see how you can connect PostNL to ShippyPro in just a few steps.
-Apr-15-2024-08-57-07-6325-AM.gif)
Summary:
1. Before you start
To connect PostNL you should ask your PostNL contact to activate API on your Credentials (Production Key).
2. Connection steps
Then add your API Key, Account Number, Customer Code, Collection Location, Global Pack to Carriers > PostNL Logo.
Enable Test Mode if you'd like to make some test shipments.
The "Test Mode" option should be flagged only if you have test credentials, not production credentials!
If you want, you can also enter a Custom Label to recognize the connection among all the others.
3. Supported services
Here a Service Code Guide that might help you with the connection:
-
EU Pack Special to Consumer 4952;
-
EU Pack Special to Business 4950;
-
GlobalPack 4947;
-
EU Pack Special Netherlands Belgium 4946;
-
Brievenbuspakje Extra NL 2928;
-
Standard Parcel 3085;
-
Priority Packet Tracked Bulk 6550;
-
Priority Packet Registered Bulk 6908;
-
Priority Packet 6405;
-
Priority Packet Boxable 6440;
-
Priority Packet Bulk 6905;
-
Priority Packet Bulk Boxable 6945;
-
Priority Packet Tracked 6350;
-
Priority Packet Tracked Bulk Boxable 6942;
-
Priority Packet Registered 6906
4. Troubleshooting & Errors
Error: Value 'Barcode.Range' is not in the correct format [0-9]
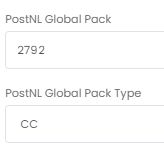
You need to check if the field PostNL Global Pack in the PostNL connection module contains only digits (not letters):

To help you easily recognize the field to fill you can find below a list in both English 🇬🇧 and Dutch 🇳🇱 :
-
PostNL Account Number (Klantnummer)
-
PostNL Customer Code (Klantcode)
-
PostNL Collection Location (Collectielocatie)
Note: Signature URL is not a mandatory field while Trusted Shipper ID should only be included in case of shipments over 750€.
The user is not authorized for this operation based on the provided Type
This error means that the selected service is not available for the chosen destination.
The receiving address has an extension, but on the label, it isn’t shown and the courier cannot find the address
If the extension was entered without a separator (like 11 3), the last part will be cut from the shipment data and will be lost: in order to avoid this, it is necessary to add a separator (like 11-3).